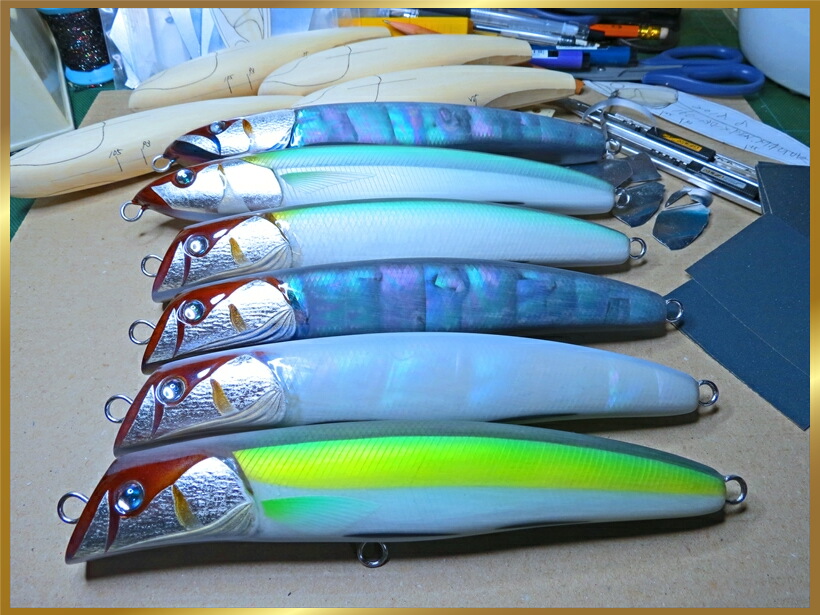
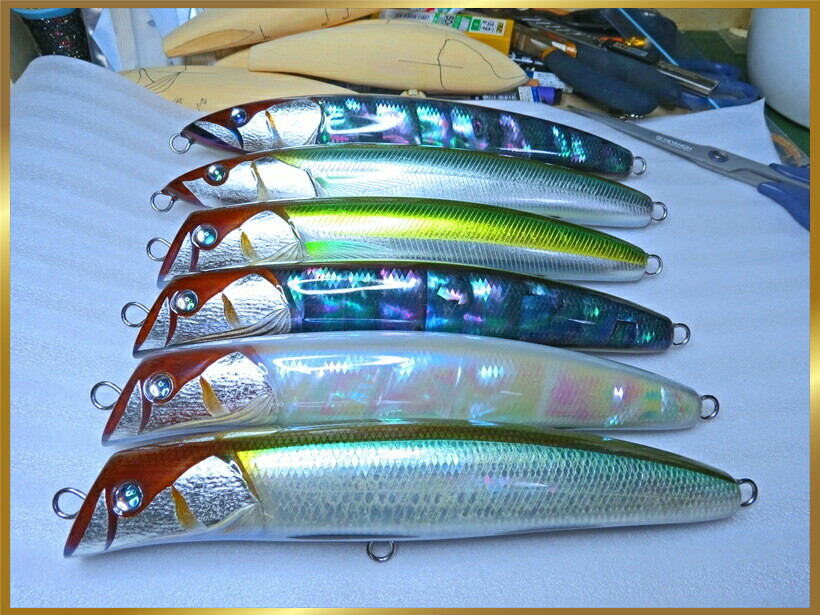
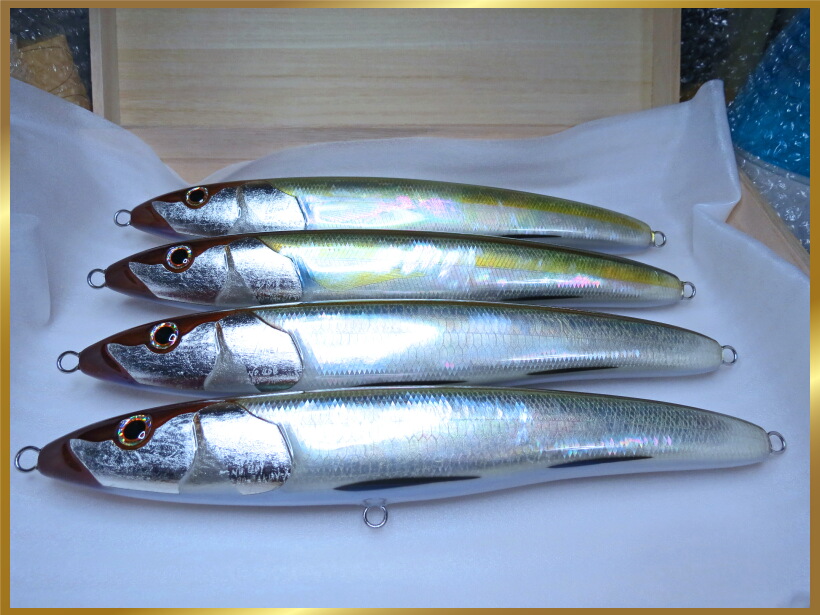
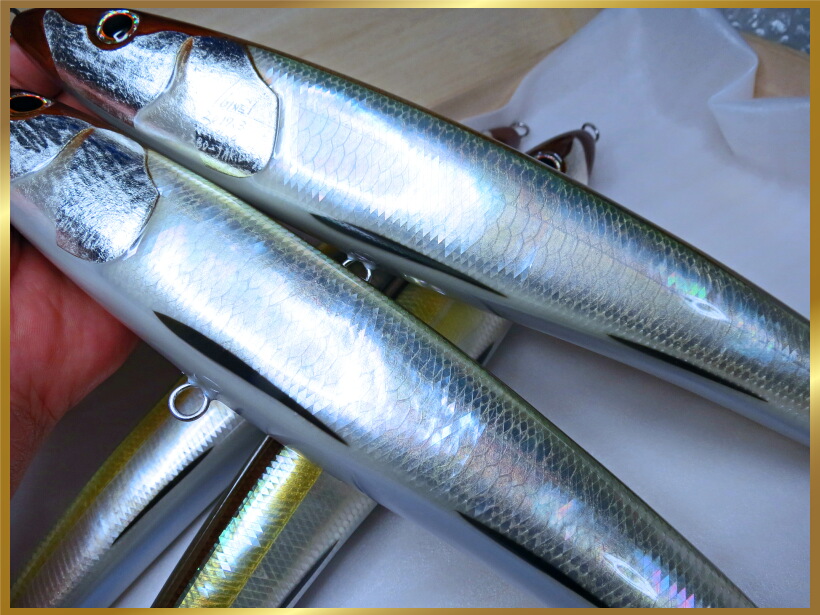
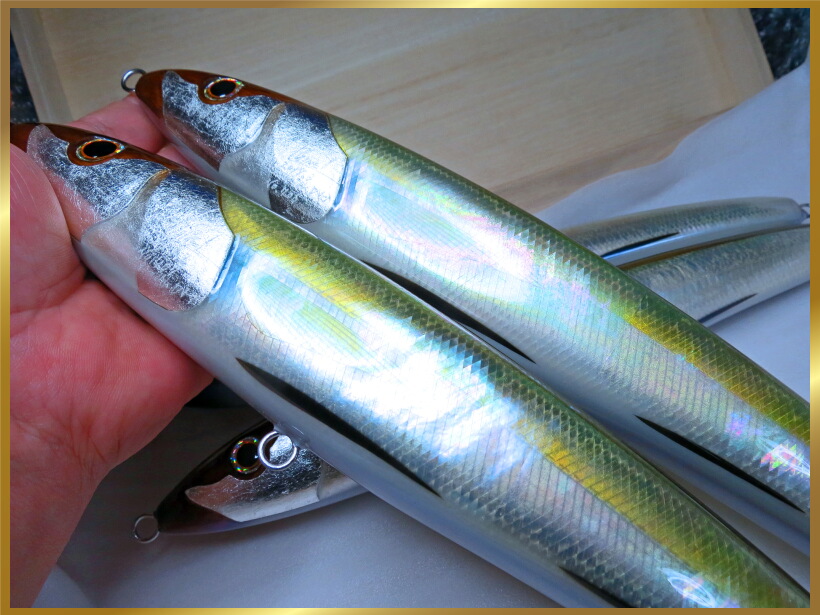
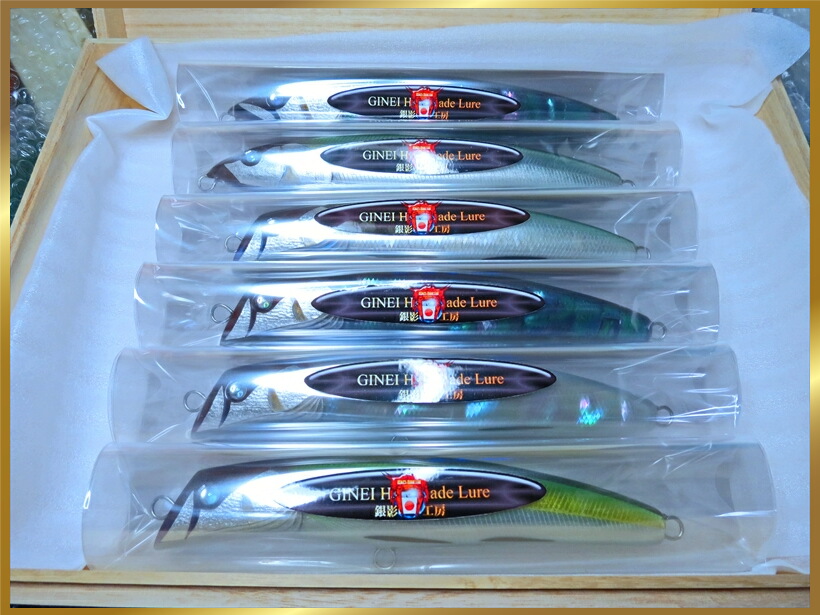
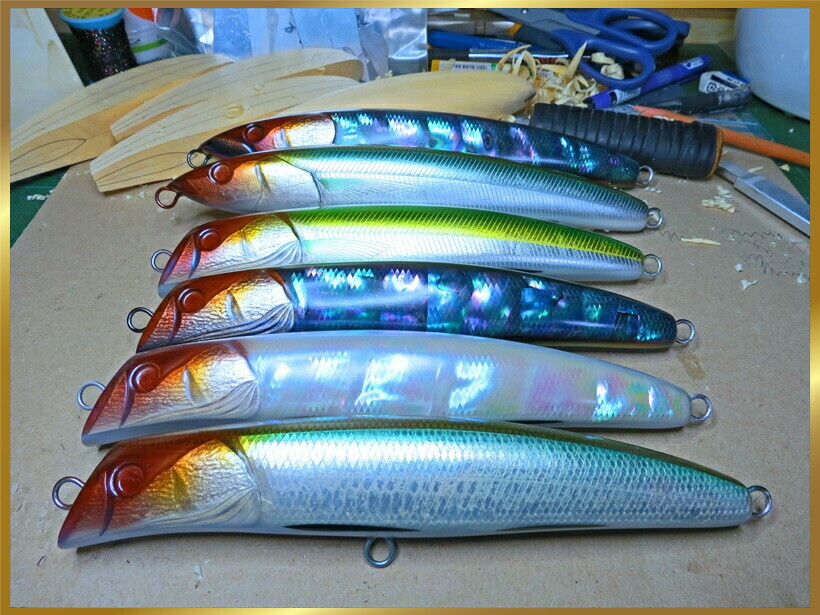
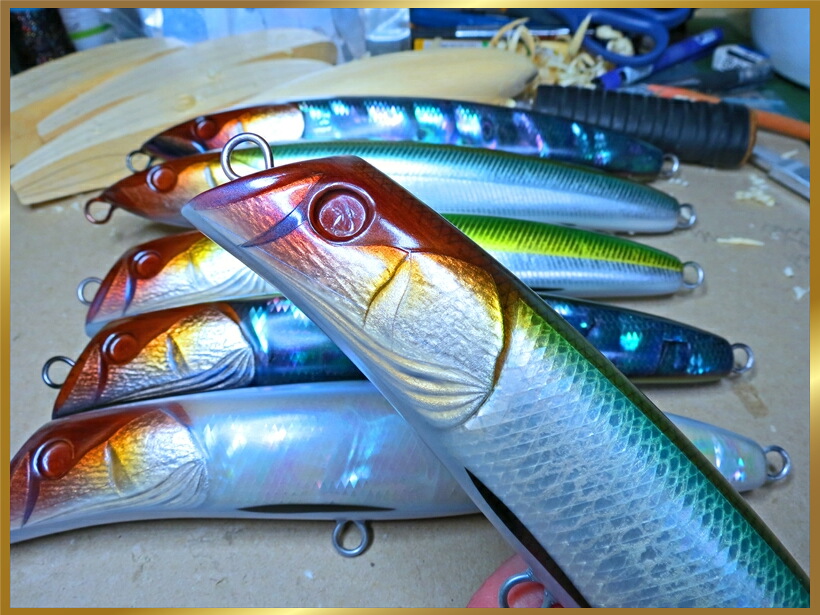
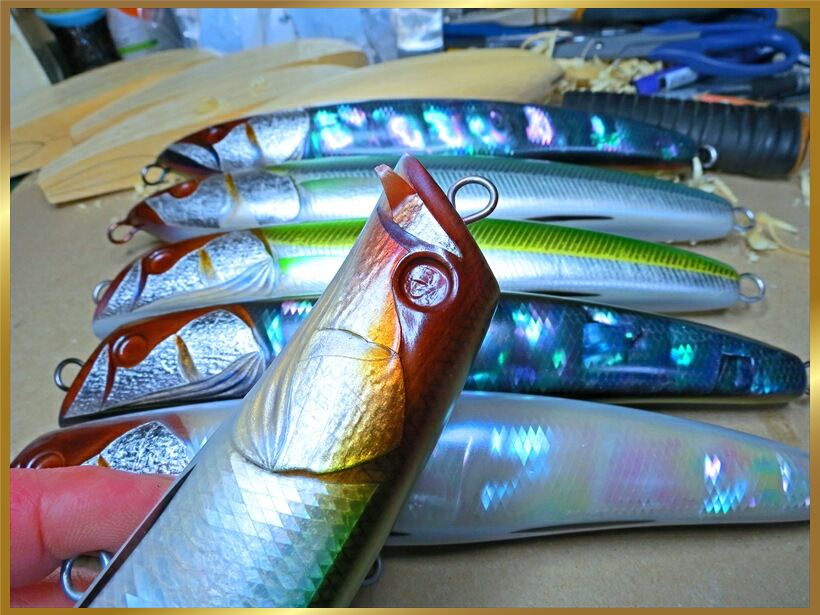
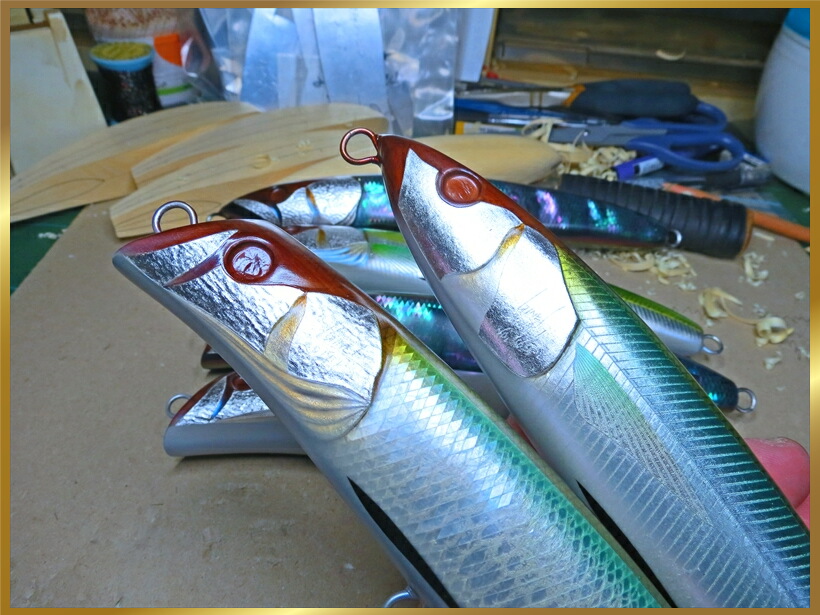
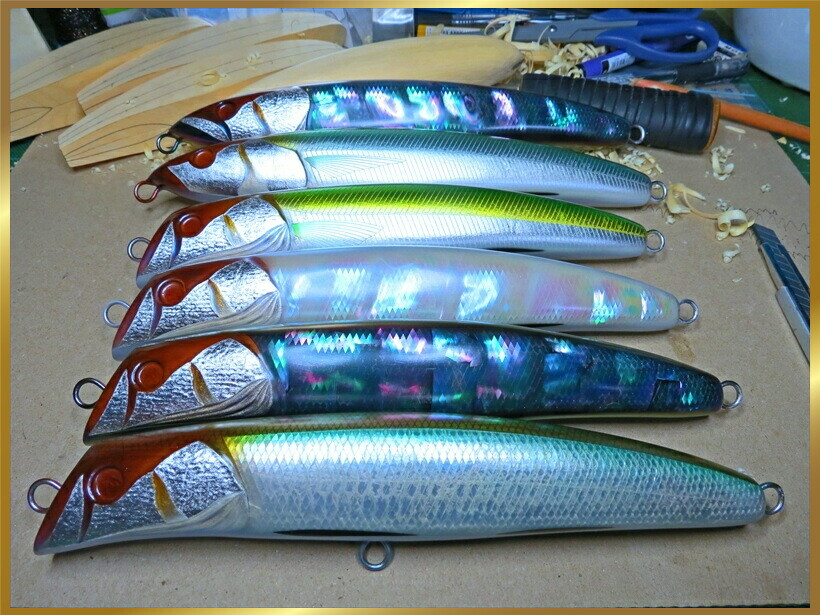
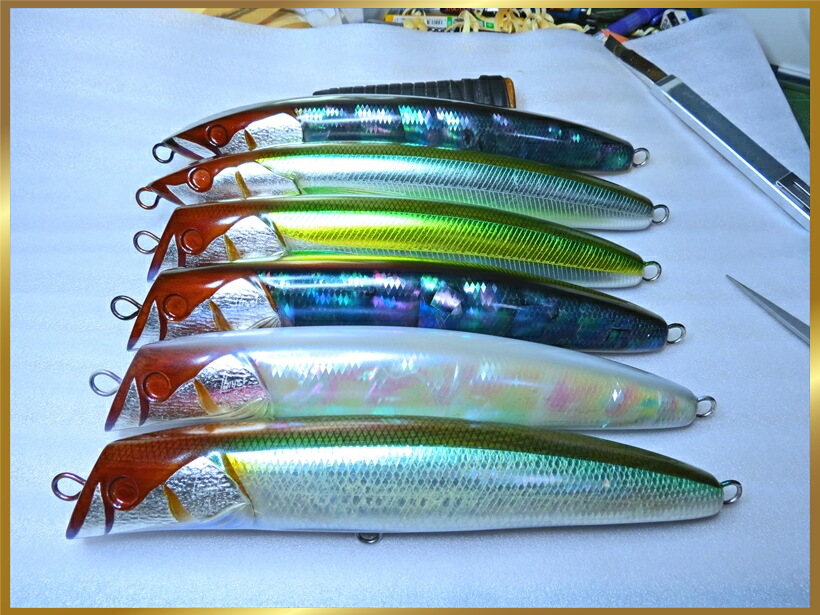
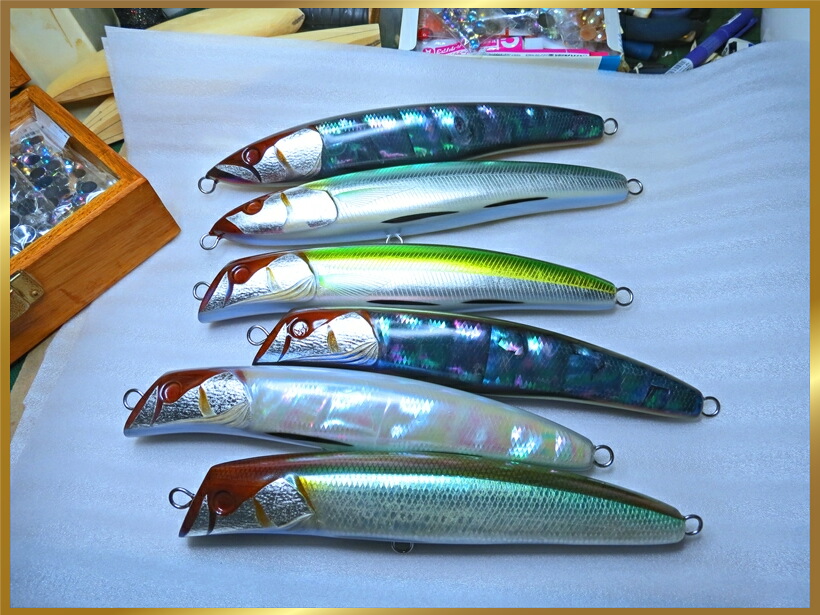
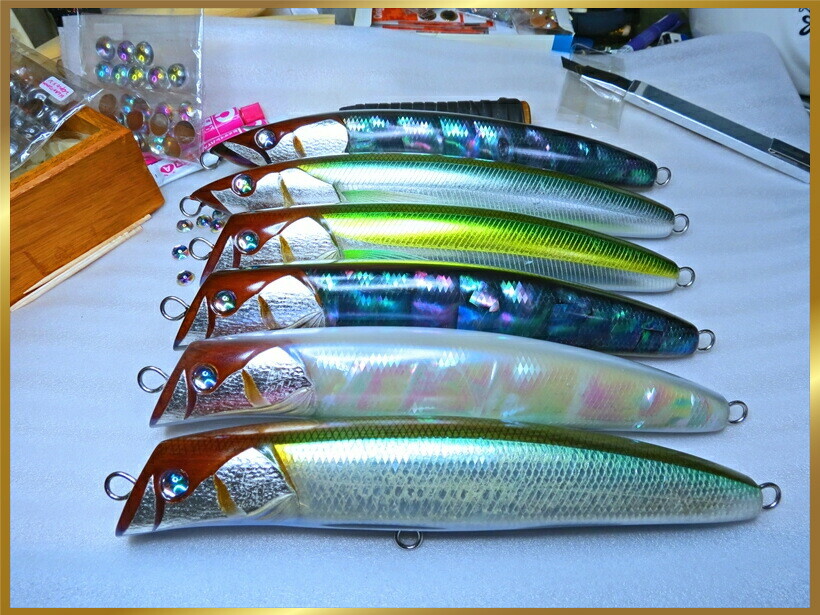
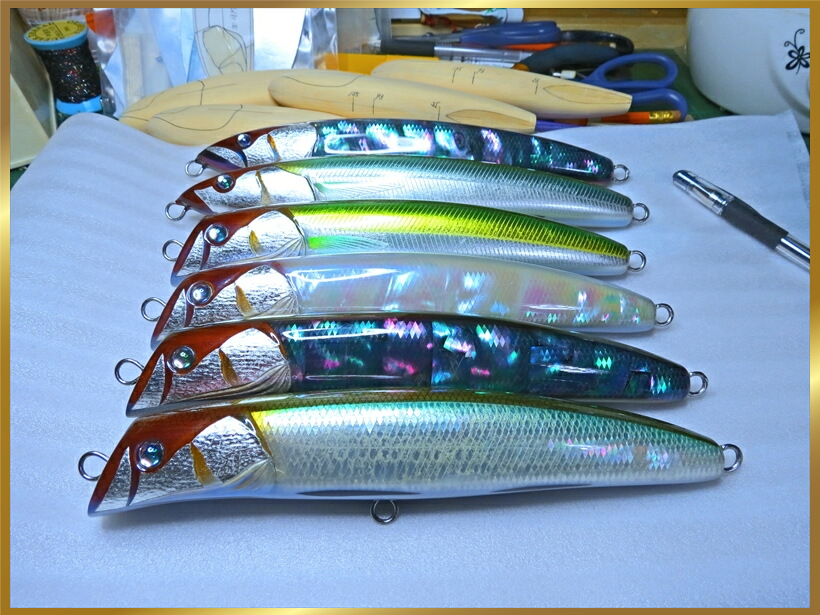
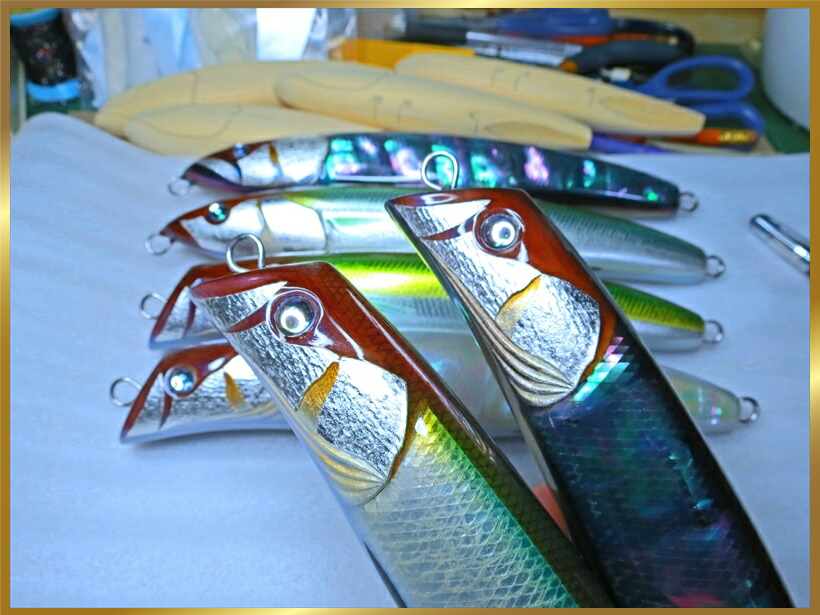
We manufacture lures using silver leaf, gold leaf, and various seashells based on ultra-precision processing of the finest wood.
Our shop mainly manufactures and sells products by receiving production requests from overseas customers.


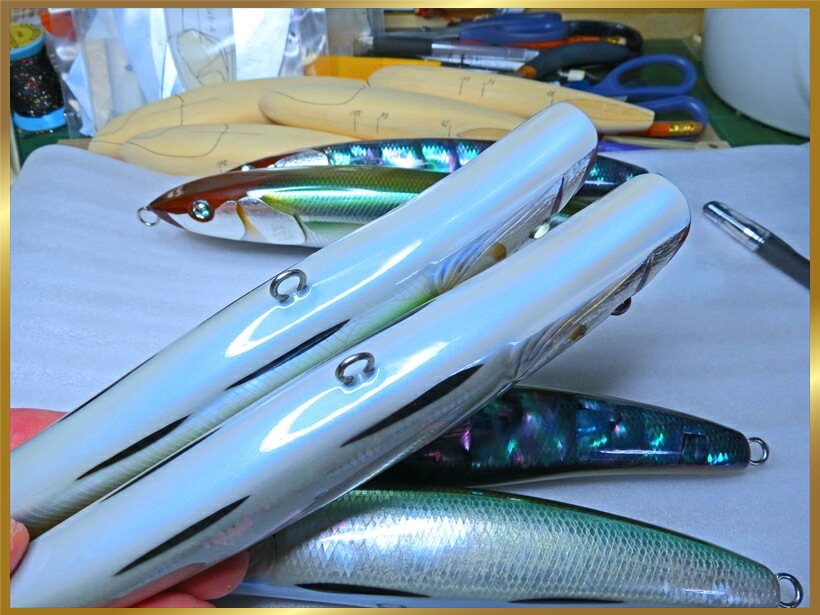
GINEI Handmade Lure Manufacturing process / Video
GINEI Handmade Lure - Production Process "Molding process"
GINEI Handmade Lure - Production Process "Silver foil / shell paste"
GINEI Handmade Lure - Production Process "Finishing process"
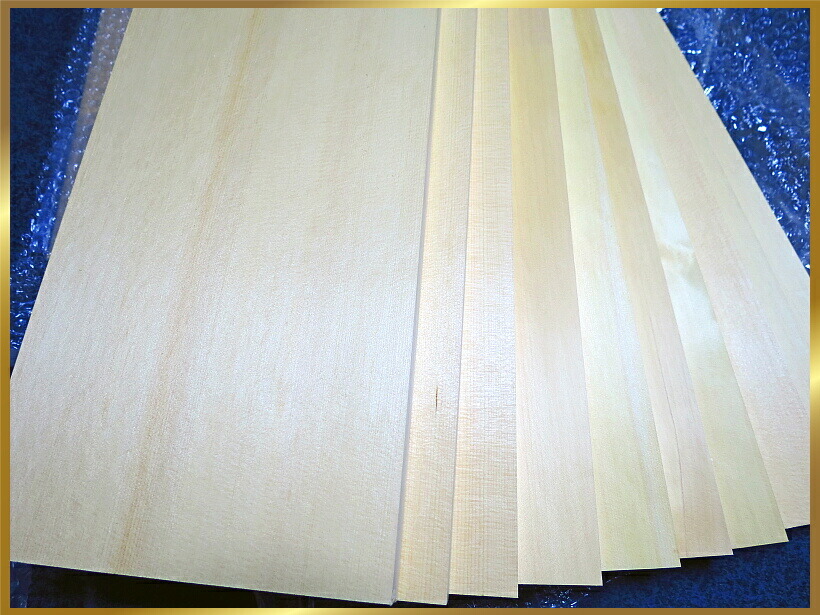
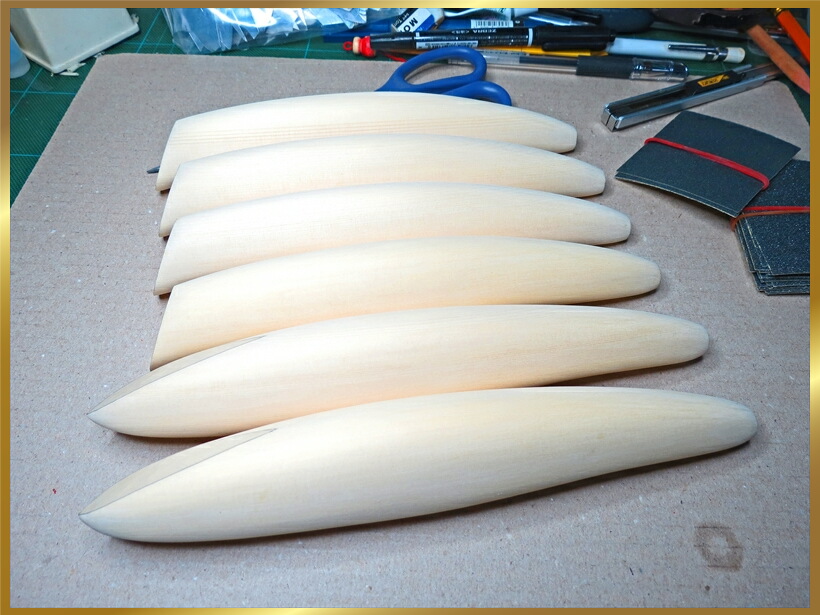
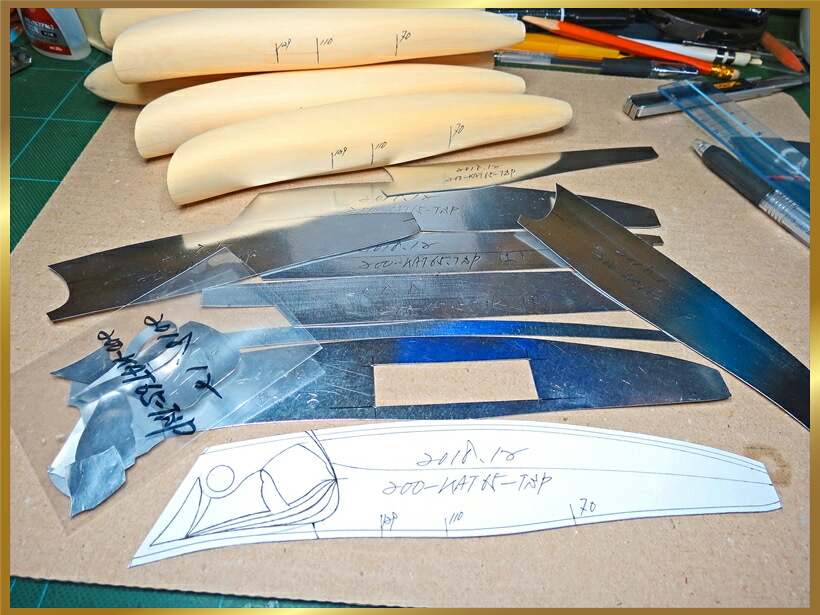
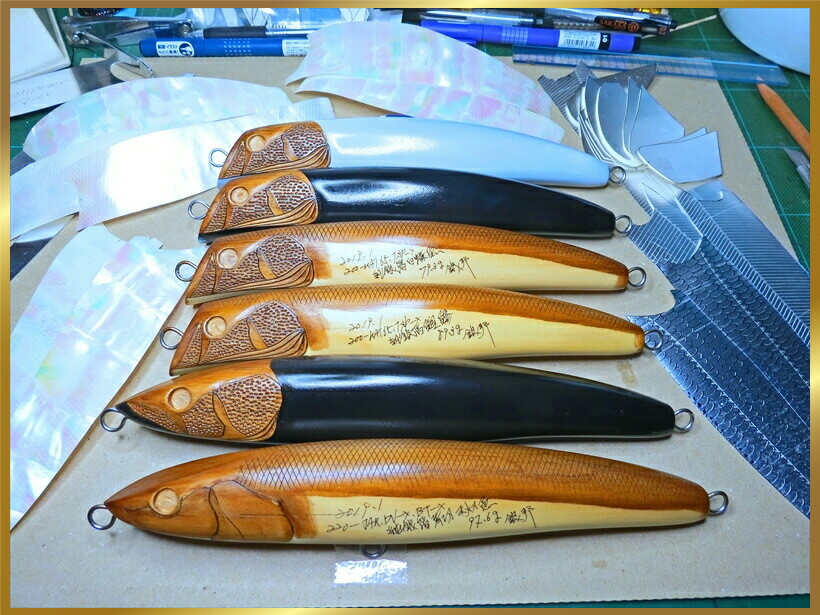
1. Wood material
"Molding process"We are using the finest Yellow Cedar "Japanese name US hiba" of carefully selected wood material.
"Other names" Alaska cypress, Alaska cedar.
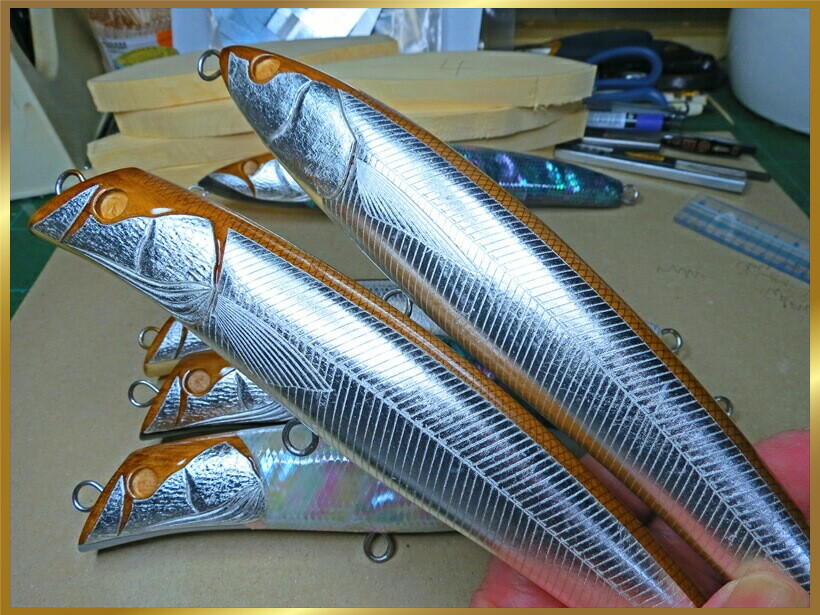
Through 50 or more manufacturing processes, we are making ultra precision lures.
When writing a lure type on a tree, it is important to look at the grain.
The position on the ventral side of the lure is positioned so that the wood grain is crowded.
If you stick together the left and right, the belly of the lure becomes heavier and the back side can be lighter.
A delicate balance feeling can be obtained by using the characteristic of the tree.
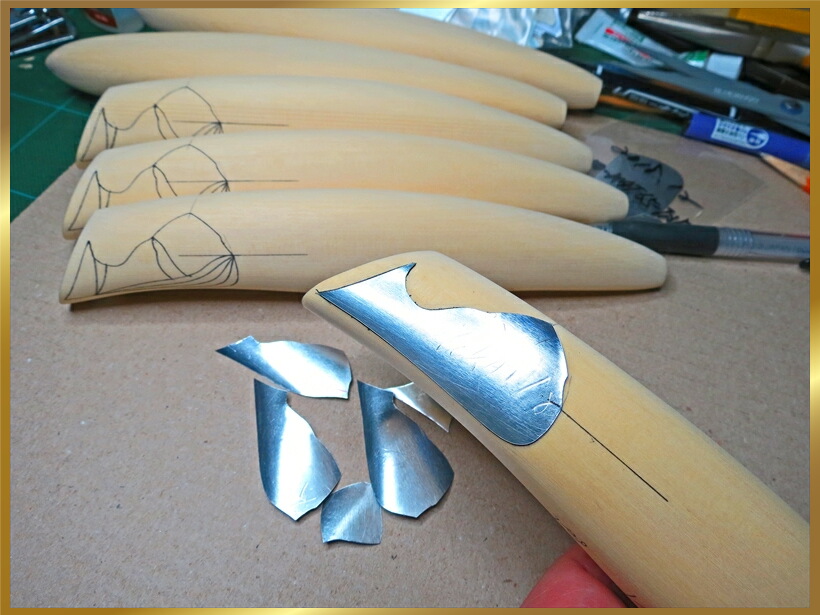
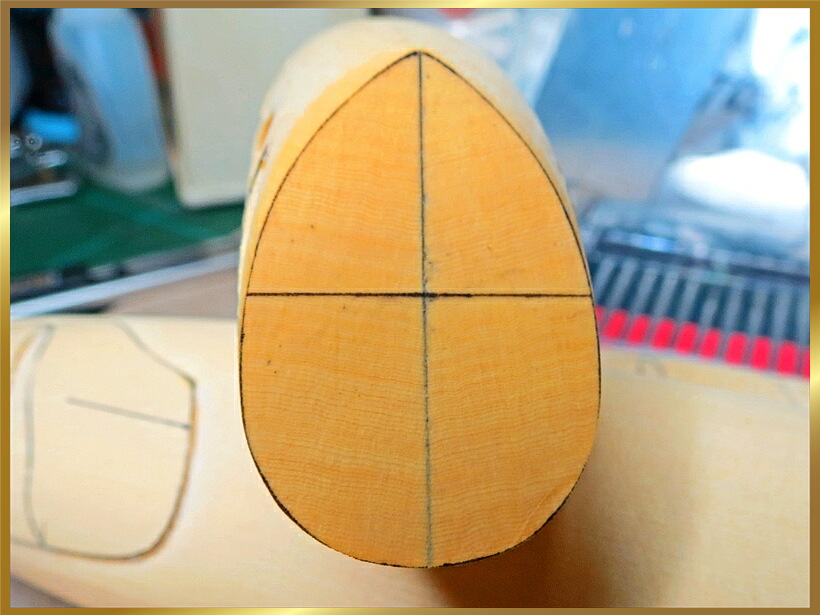
2. Outline Molding
After cutting "width" "standing width", it cuts it to a round shape.
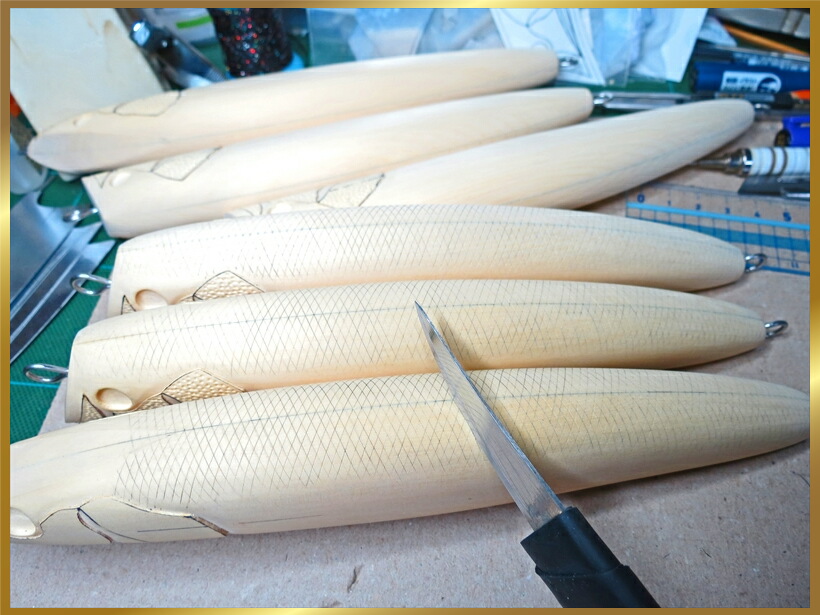
Unless molded accurately, equivalent lure products can not be made.
I am forming with a knife finish sense.

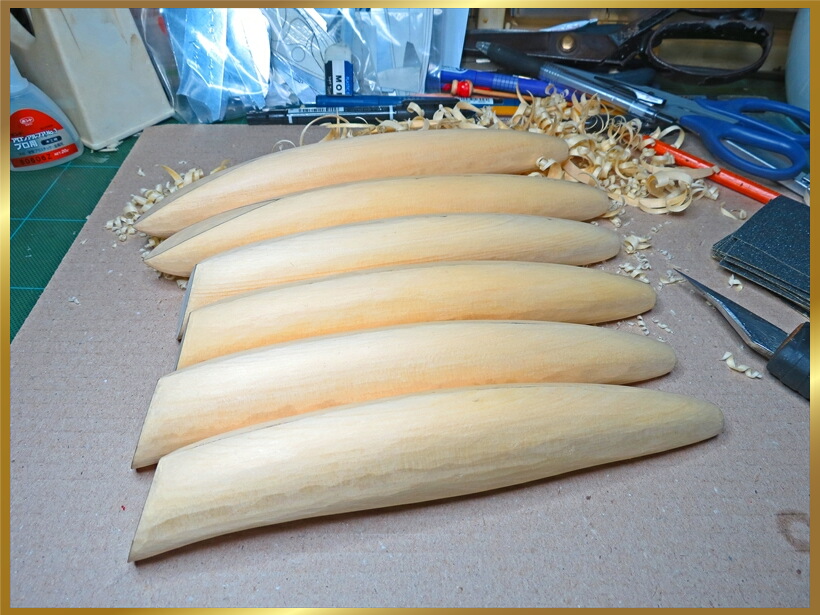
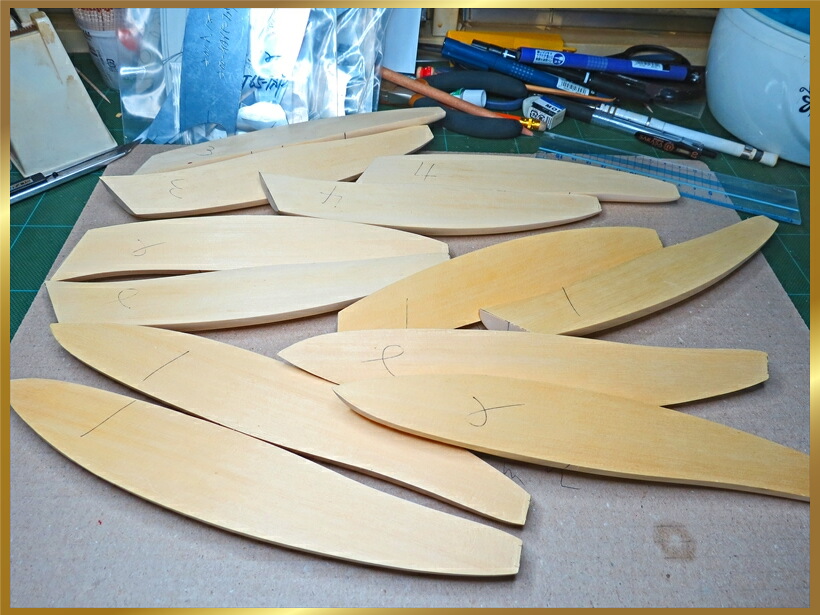
3. Completion of cutting of outer shape
The cutting of the outer shape with the knife was completed.
4. Sandpaper Finishing
I am doing it beautifully with sandpaper hanging on the finish of the external shape.
We will finish with sandpaper to such an extent that surface irregularities disappear.
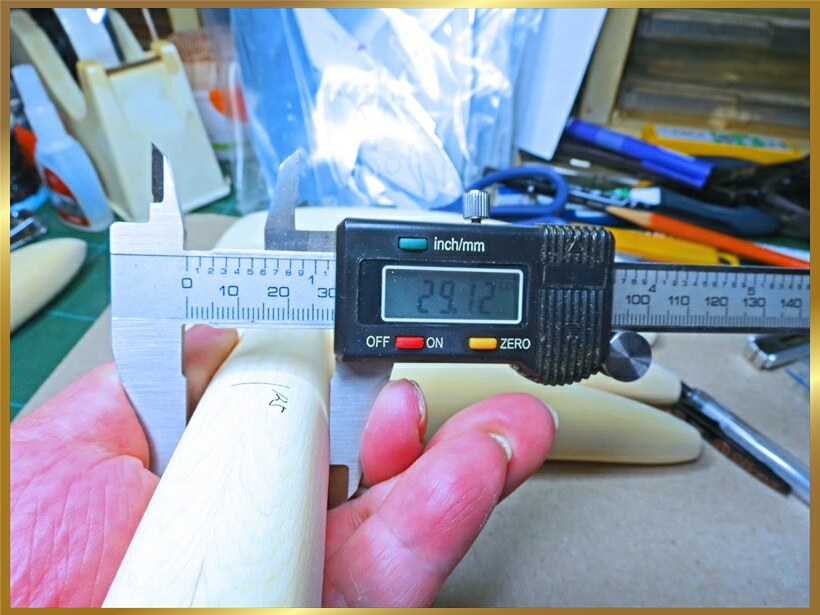
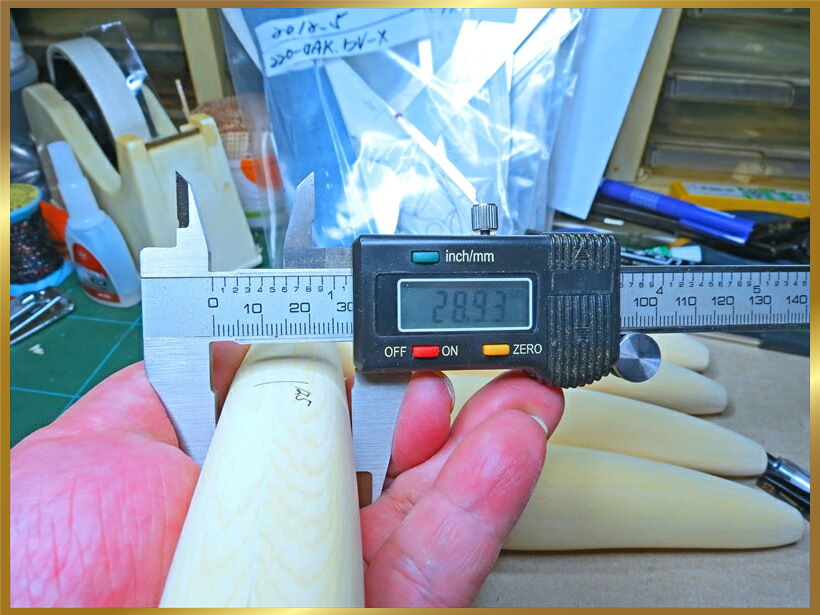
5. Precision molding
Measure the error Each error is 0, 5 mm or less.
The first manufacturing process is important.
6. Avoid molding errors
The error will be 0,2mm, each error will be set within 0,5mm.
In the case of the same wood, an error of grams is usually ± about 2 g.
The difference in the number of grams will change with the weight of the wood.
Due to the difference in the weight of the wood, an error of about ± 5 g maximum appears.
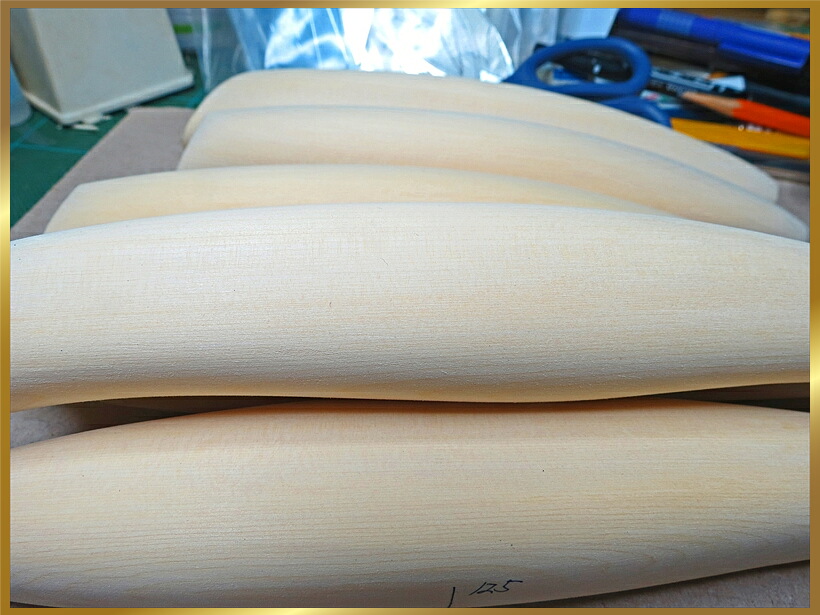
7. Ultra precise wood grain
I think you can see that the wood grain is crowded.
If it is not "US hiba" material, "GINEI Lure" will not be born.
Up to this point, I have informed you of precise molding, but it is not a part that emphasizes only the precision difference.
Precision molding becomes a good balance and it is reflected largely in lure action.
We, the builder industry will be over 30 years.
We have been cutting thousands of lures so far so we can produce equivalent lure products.
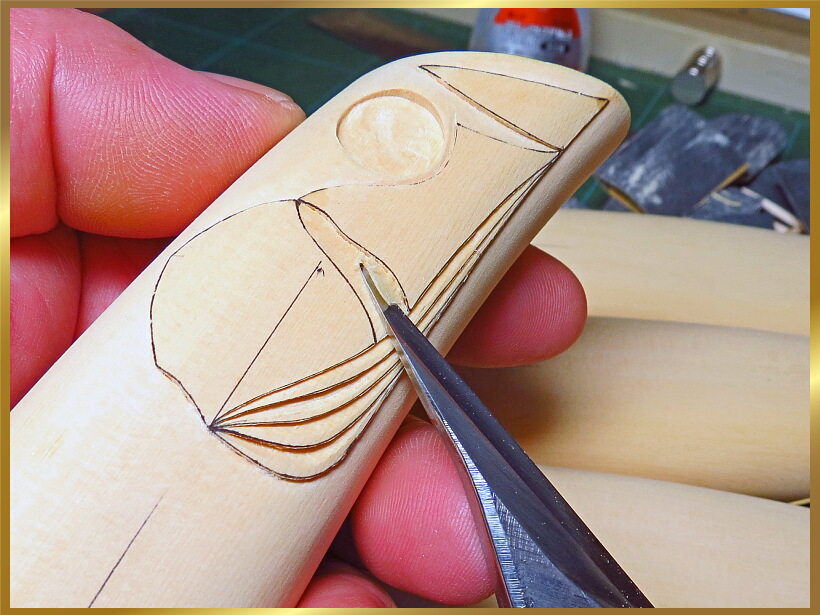
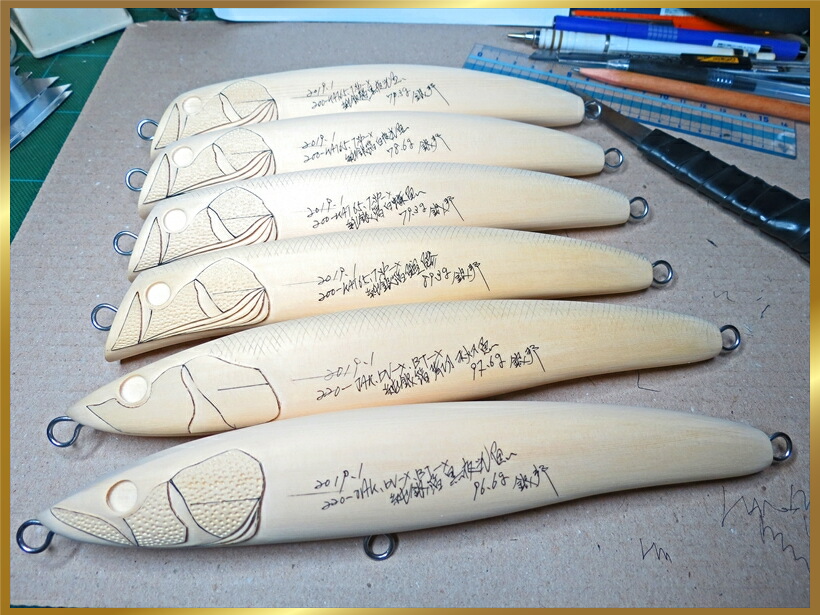
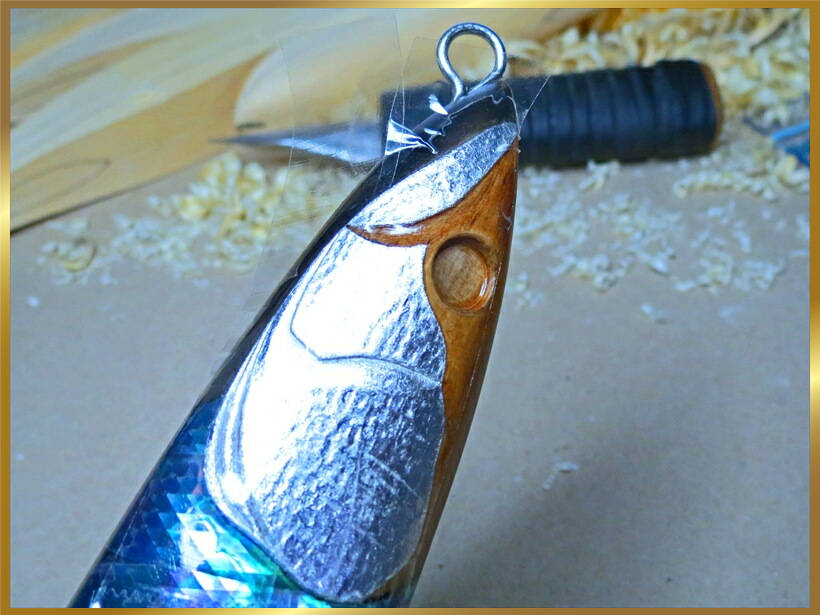
8. Face
I am doing it beautifully with sandpaper hanging on the finish of the external shape.
We will finish with sandpaper to such an extent that surface irregularities disappear.
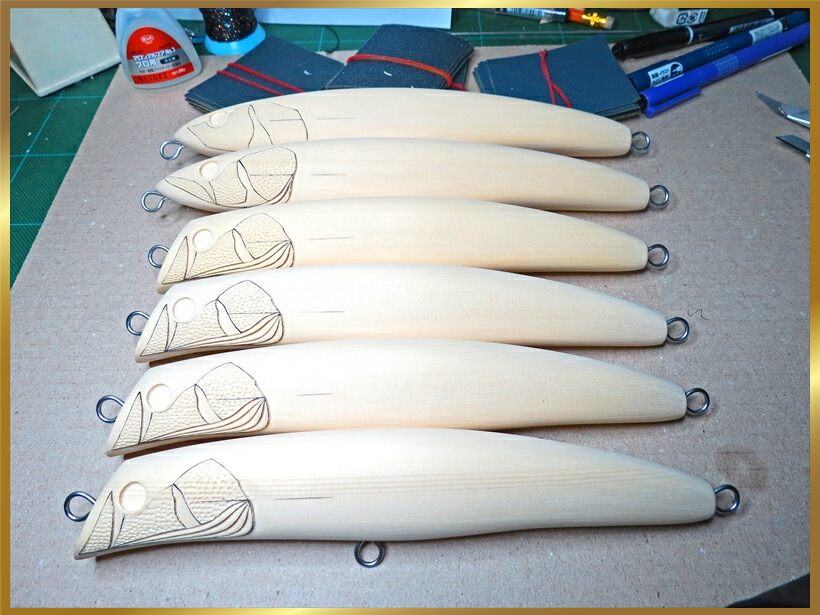
It becomes a process of facial carving.
Even in order to evenly carve the left and right positions, underline is drawn using the mold.
9. Face carving
After underlining, cut it with a knife along the underline.
We will scrape with the underline as the axis.
After engraving with a knife, we will finish sandpaper.
Formation of the outline was completed here.
By the way, the large lure does not have much elaborate lure.
We are pursuing a real difference by spending time and effort spending time to make a lure which is nothing else.
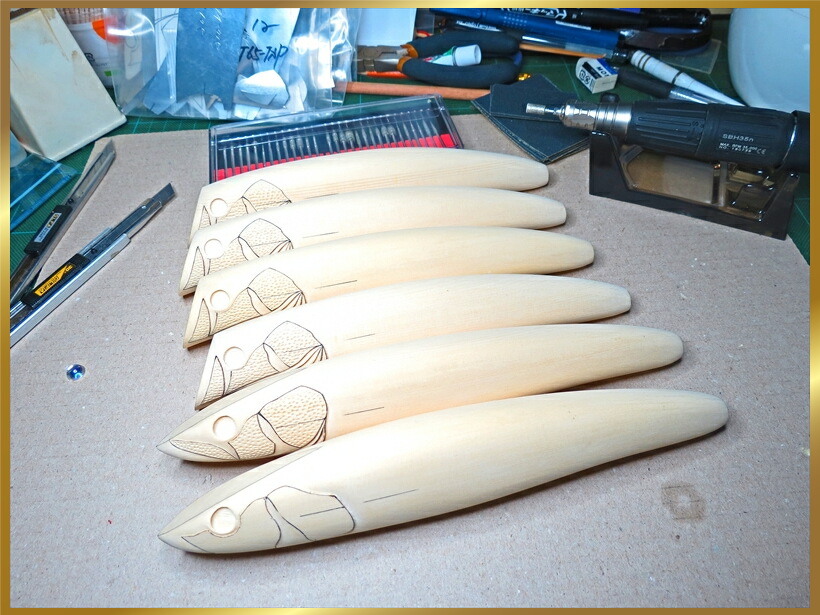
10. V shape of wood grain
I think that you can see that the wood grain is V-shaped when we combine the grain materials.
The lower side gets slightly heavier and the upper gives delicate buoyancy, giving an exquisite balance feeling.
Ultra precision shaping taking advantage of the characteristics of the material is the basis of the GINEI Lure.
11. Divide timber into two pieces
Divide the left and right wood that was temporarily affixed with double-sided tape into two pieces.
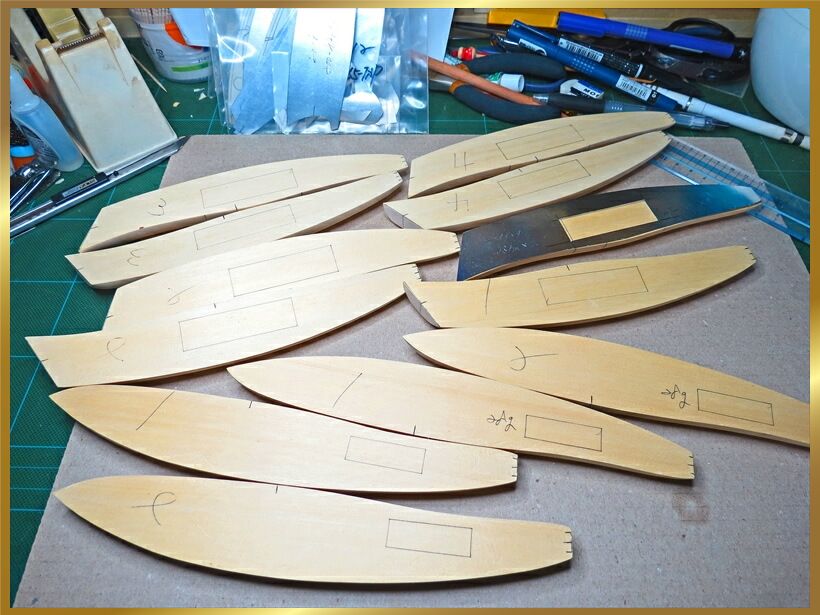
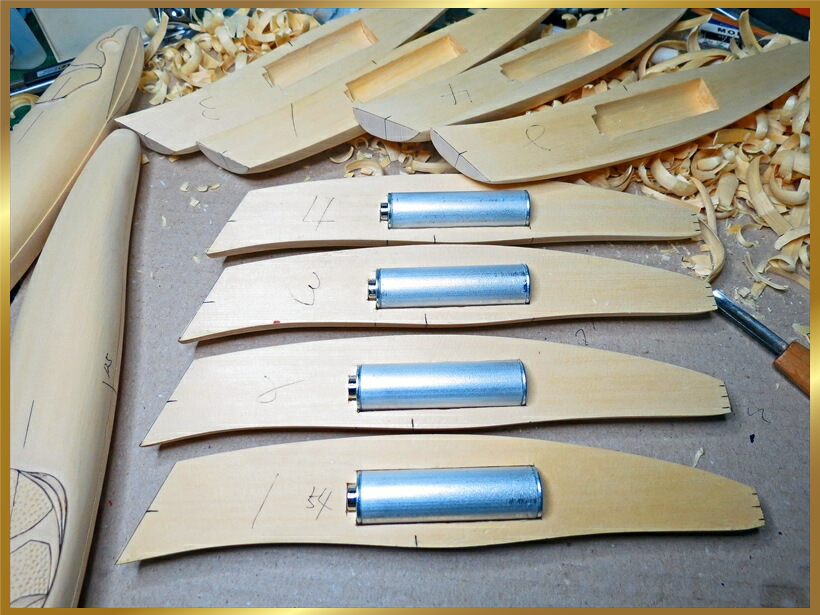
12. Inner diameter structure
In order to determine the position of the center of gravity of the inner diameter, we draw an underline using a mold.
It cuts with a knife along the underline and carved with a sculpture sword.
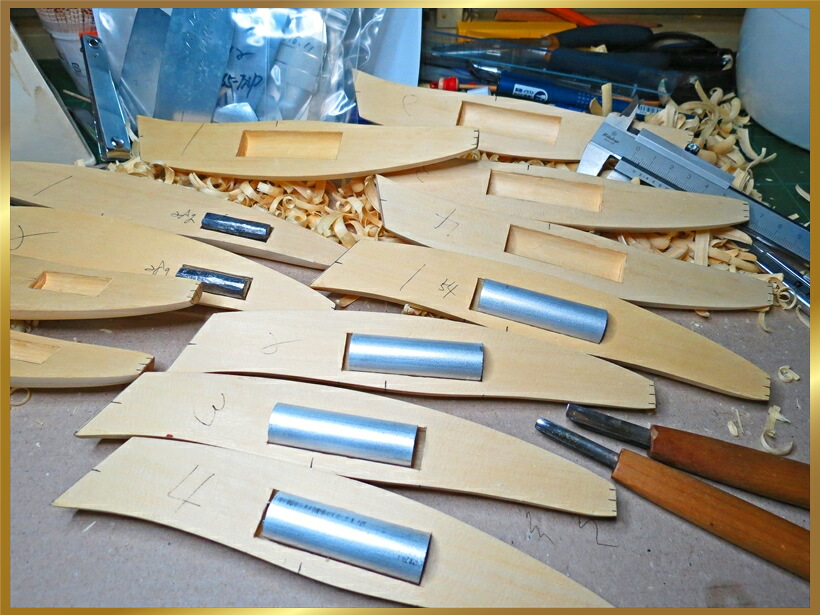
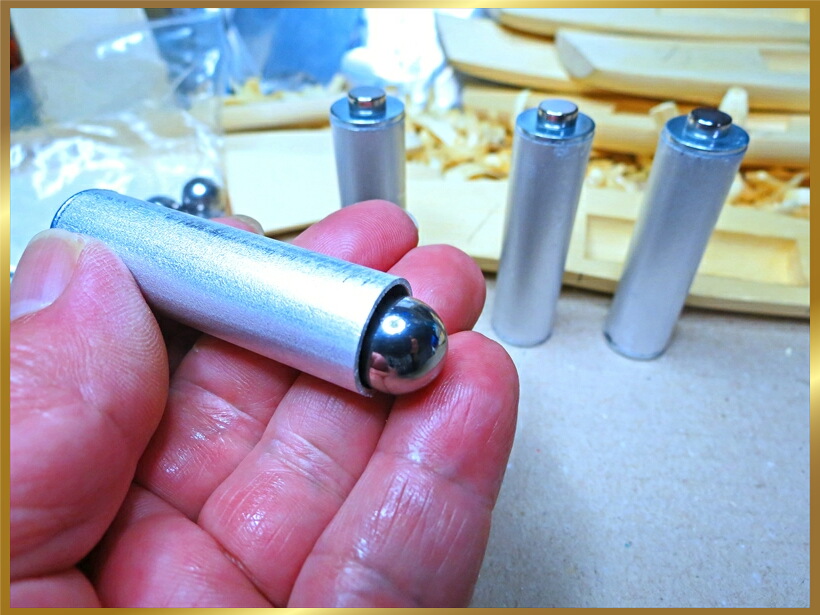
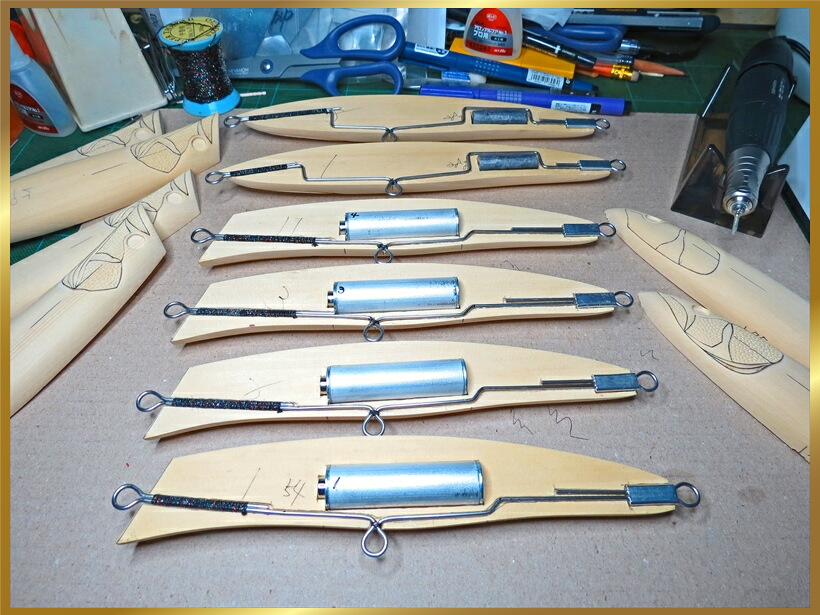
13. Center of gravity movement system
We will set the inner diameter center of gravity movement system.
A moving ball uses a chrome ball.
The mobile room uses pure aluminum pipe.
Chrome ball We will set it so that we can afford to some extent.
I pasted an iron circle on both ends and made it completely waterproof.
By the way, since the center of gravity movement system has been doing for more than 25 years ago,
I have been doing it from the early days in Japan.
14. Hook hanger
Before that, we will introduce the system, the center of gravity movement system uses chrome balls as the moving balls.
Since the magnet is attached to the side of the head, the ball moves to the head side as soon as the lure lands on the water.
The floating posture of the lure becomes horizontal, which creates an exquisite sense of stability.
Not just jerk dive movements. Great S-shaped action is possible.
We will introduce the contents of hook hanger.
We are using 1, 6 mm of hard tone stainless steel wire.
We fix the folded part with repair thread in one piece, we are enhancing the strength.
No matter how big a fish catches, the hook hanger will not be destroyed.
Strip rings and hooks will cause damage.
The work of the moving system and hook hanger production has ended.
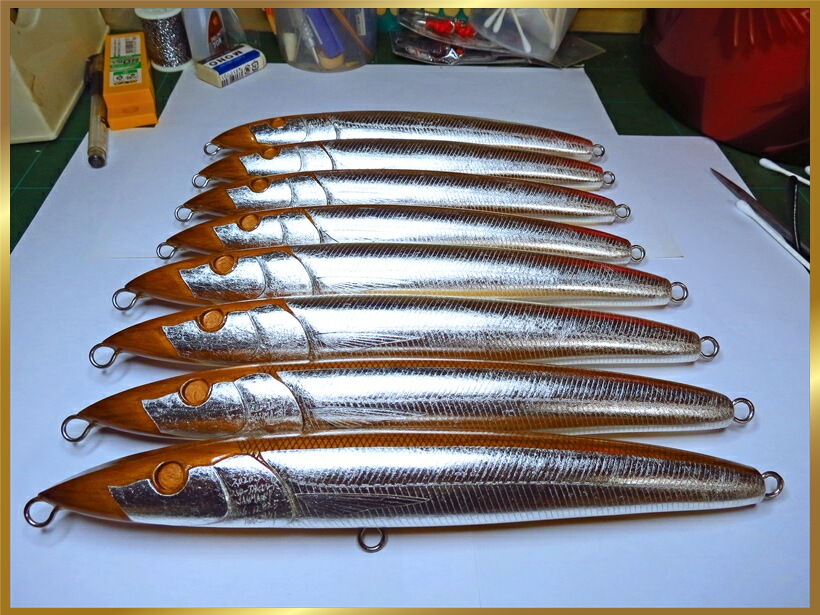
There are different versions of the same lure item by weight, position, length, number of chrome balls of the moving system.
In other words, depending on the type of lure posture another lure action is born and there are many version products.
15. Laminate the left and right wooden molds
Since the Center of gravity movement system, the hook hanger was completed, next we will begin bonding the inner diameter.
In particular, we strongly pour adhesive into "Center of gravity movement system" part to enhance strength waterproofness.
Tighten the right and left wood with glue so that it does not get exactly wrong.
We use rubber to further enhance adhesion.
In order to enhance the strength waterproofness, we will reinforce the bonded part with adhesive from the outside.
After completing the right and left lamination, we will finish the sanding with sandpaper on the whole.
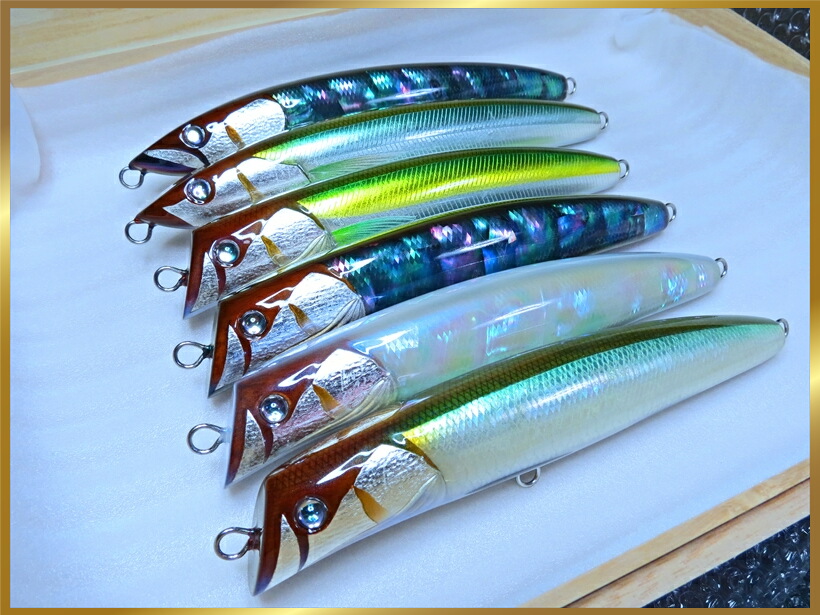
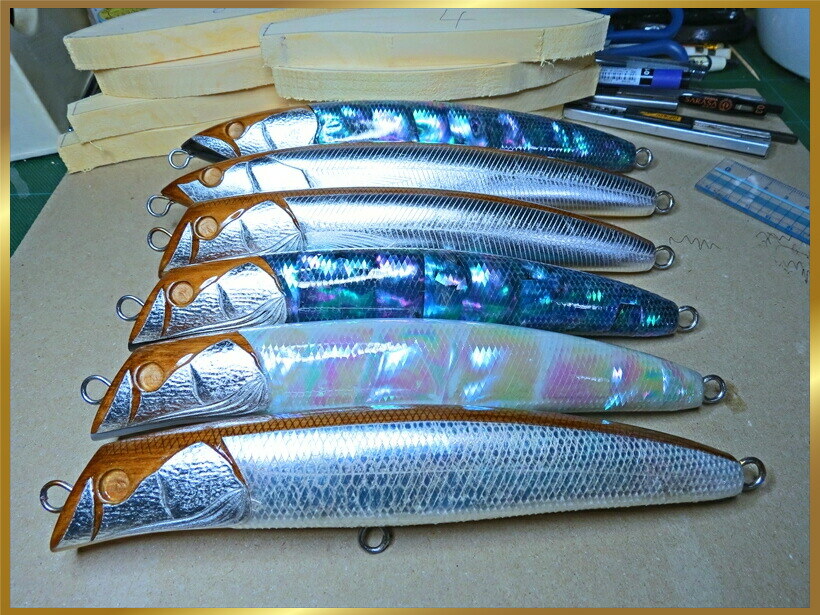
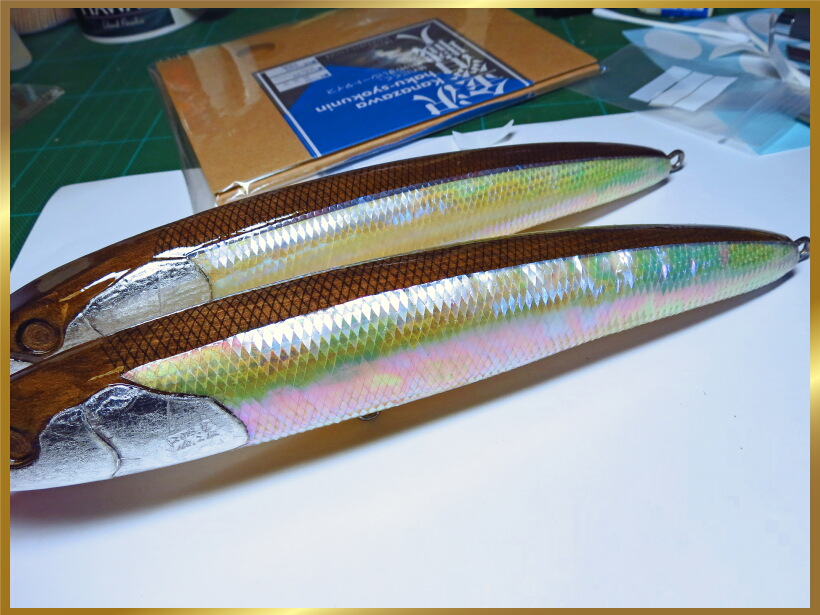
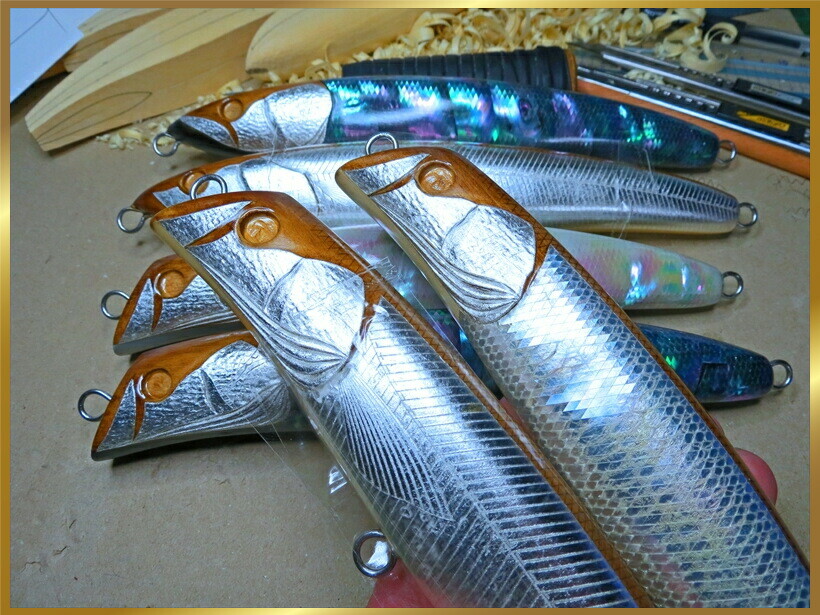
16 Specification of back scales pattern
Back scaled pattern specification, "Saury fish", "flying fish" It is the specification type which gave the wood grain.
Other back scales pattern specifications are also available in the version item.
Underline at 2 mm intervals.
Next, cut into the diamond shape with a blade along the line.

17 Outline Molding Completed
It is the completion of the back scales pattern.
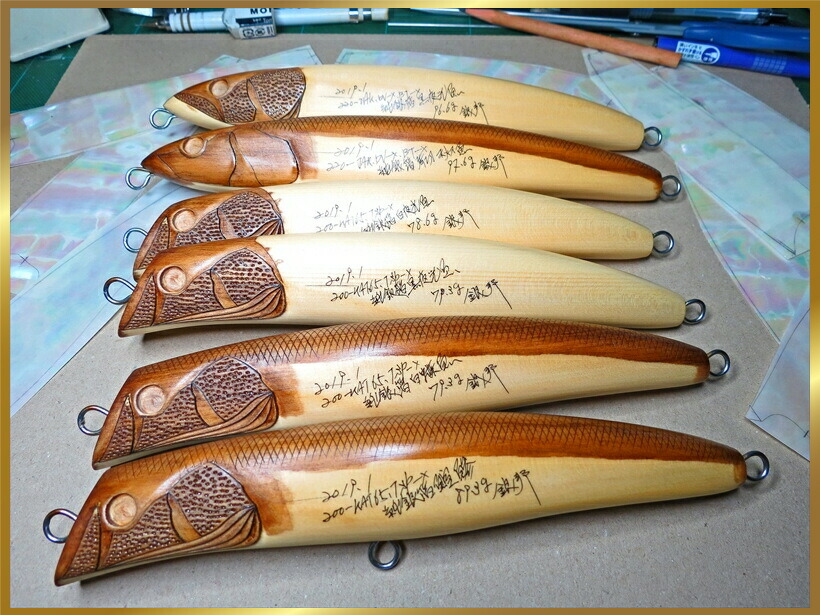
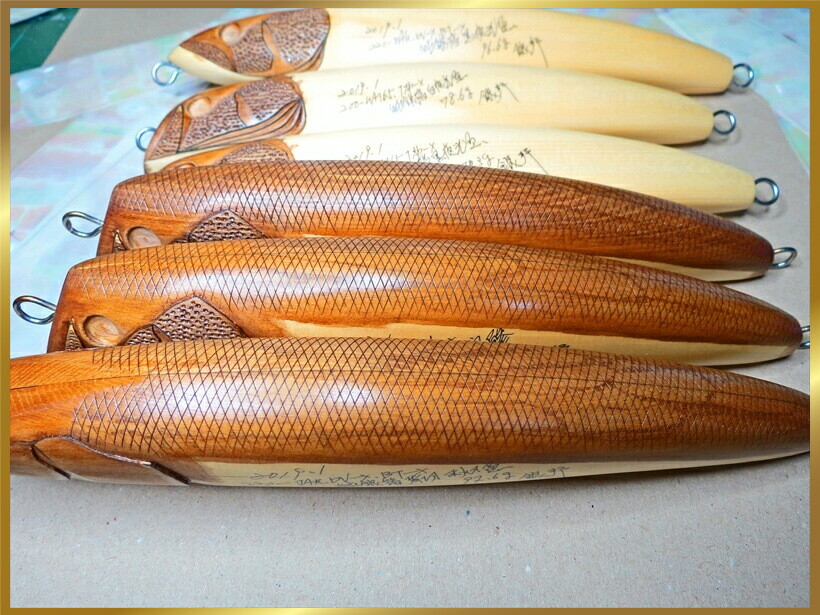
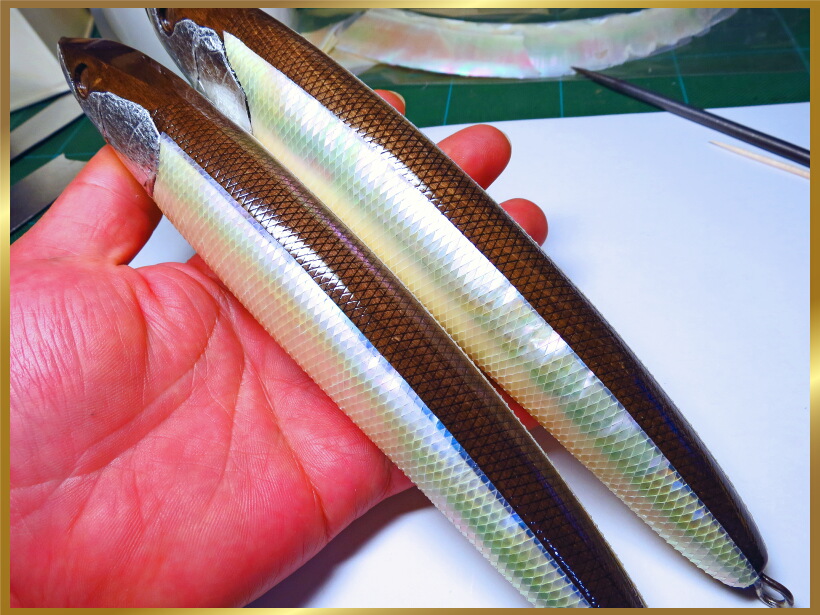
Next, in order to give the texture of the wood, paint the oil stain.
In the case of back scaled pattern design, I will paint the entire back.
Oil stain coating completed.
After this, apply cellulose cement (film coating) twice.
I briefly explained the molding process.
We have numbered each process and introduced them, but there are many more processes in the actual molding process.
The most important element in making a lure is the lure balance.
Since the movement and balance of the lure are determined by the molding process, we perform ultra-precision molding.
The value of a lure is evaluated only when it is moved, which is different from other products.
It's often said in our industry that it brings lures to life, but it's also a builder's eternal challenge.
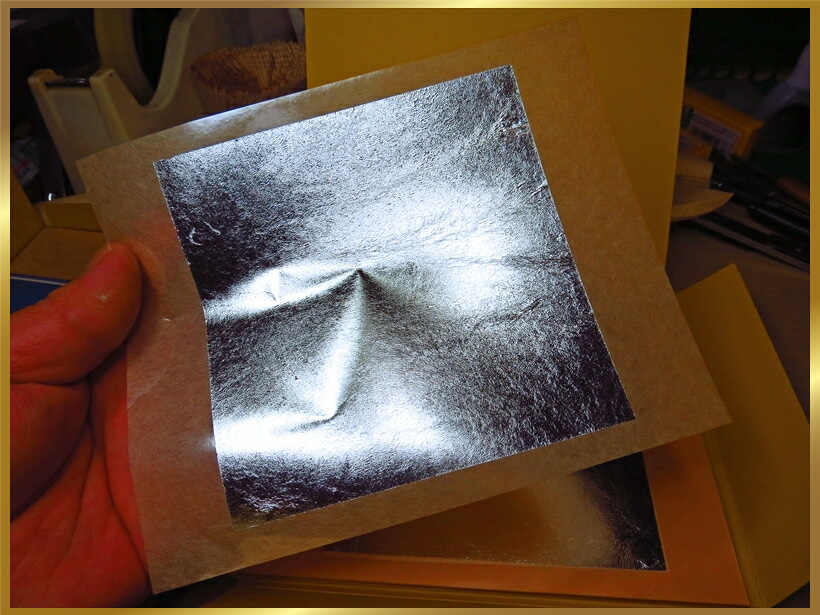
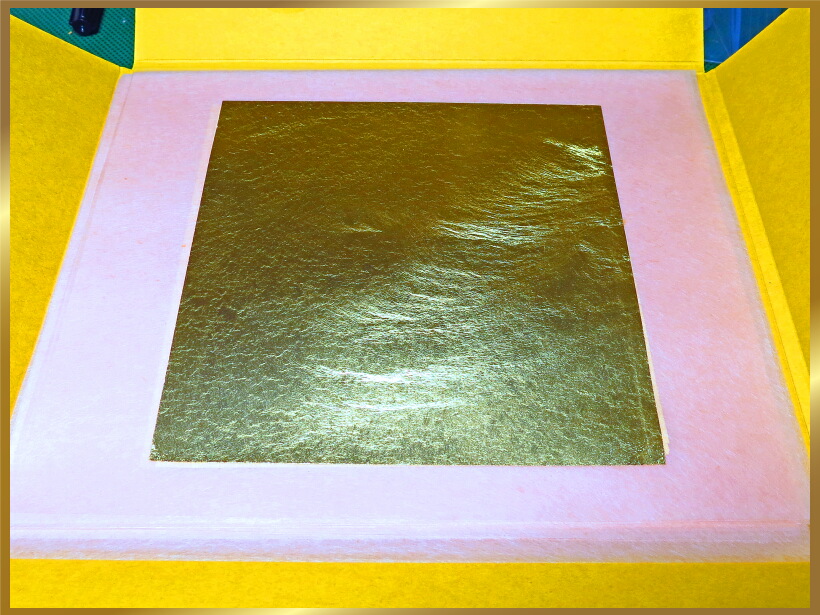
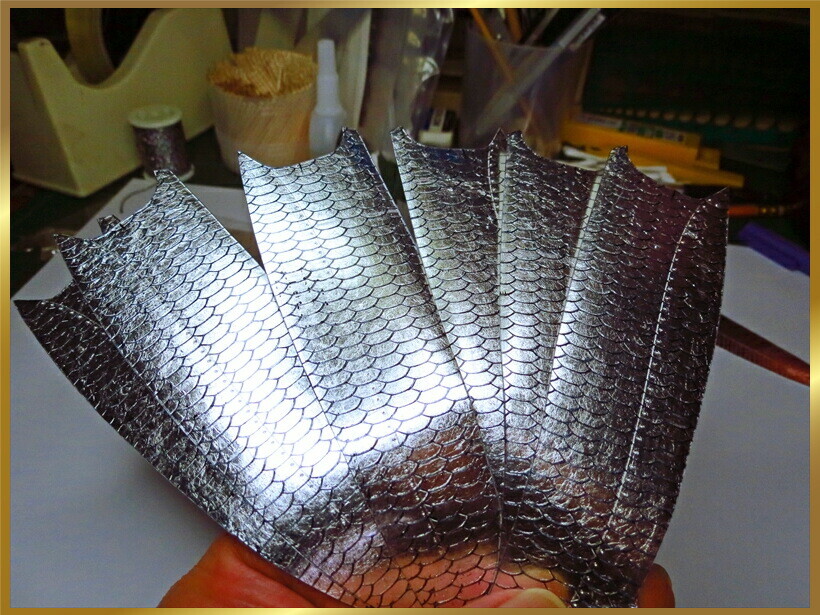
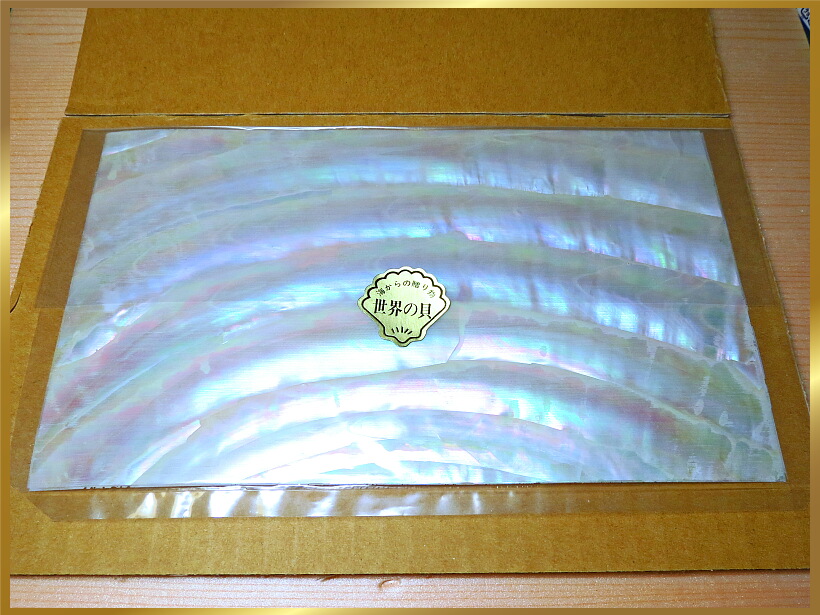
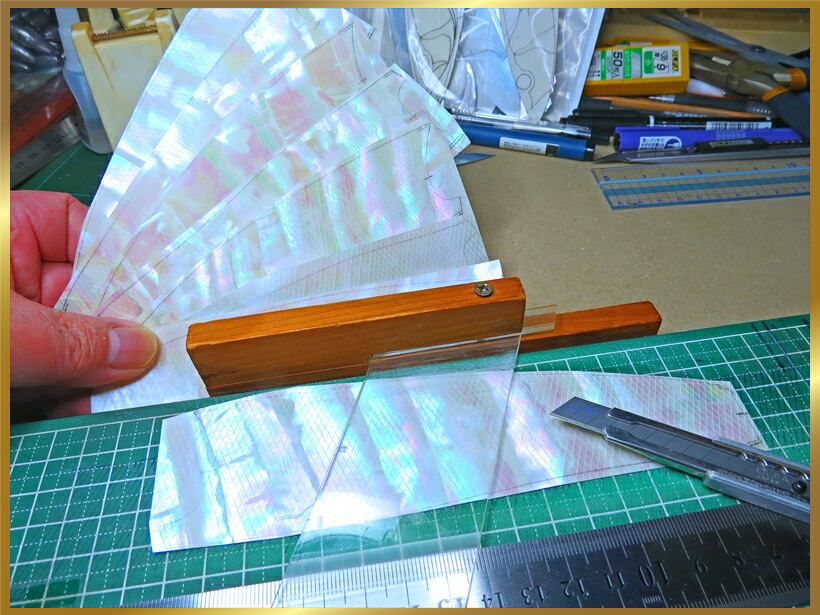
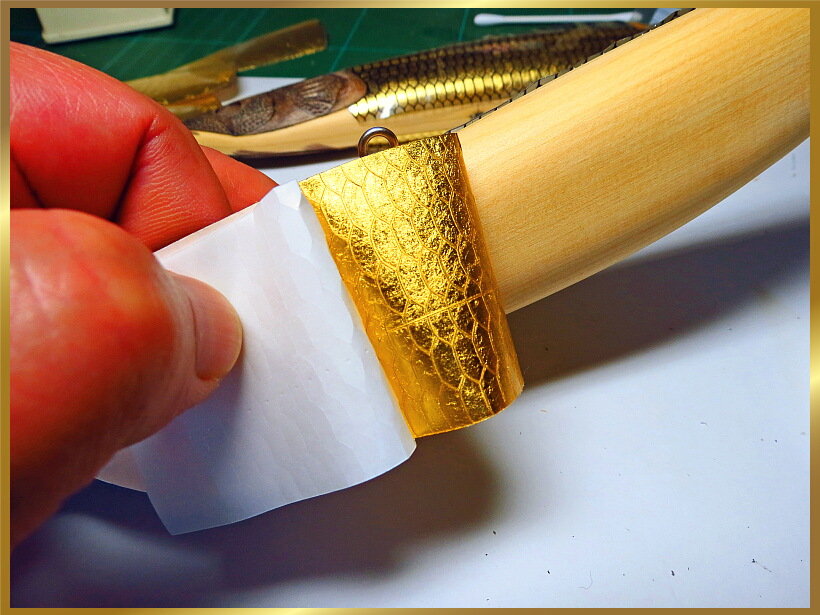
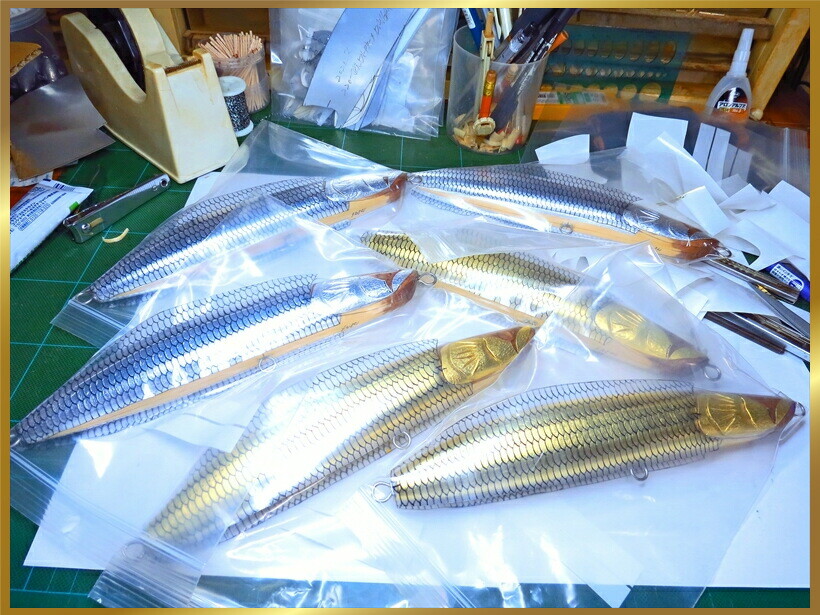
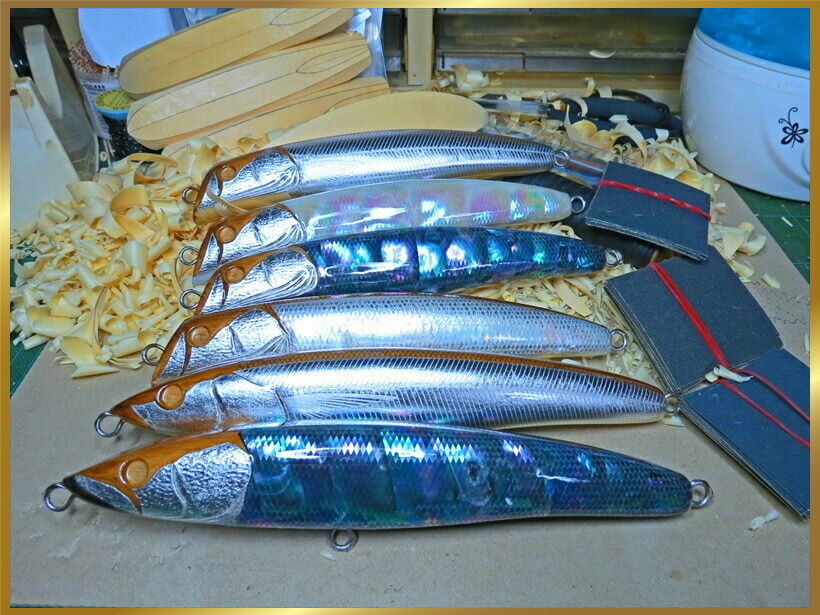
18. Pure silver leaf / Pure gold leaf / Shell pasting process
"Silver foil / shell paste"I will introduce the foil before starting the work of pasting pure silver foil / shellfish.
The material of the foil is pure silver foil, pure gold leaf, pure platinum foil, and pasting specifications.
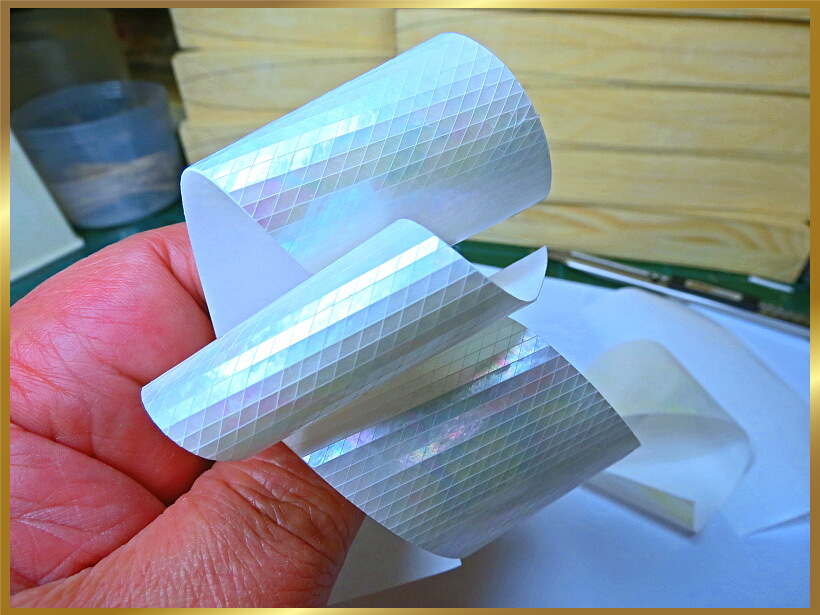
Pure silver foil thickness (1/10,000 mm micro) Pure silver foil (100% silver) is used.
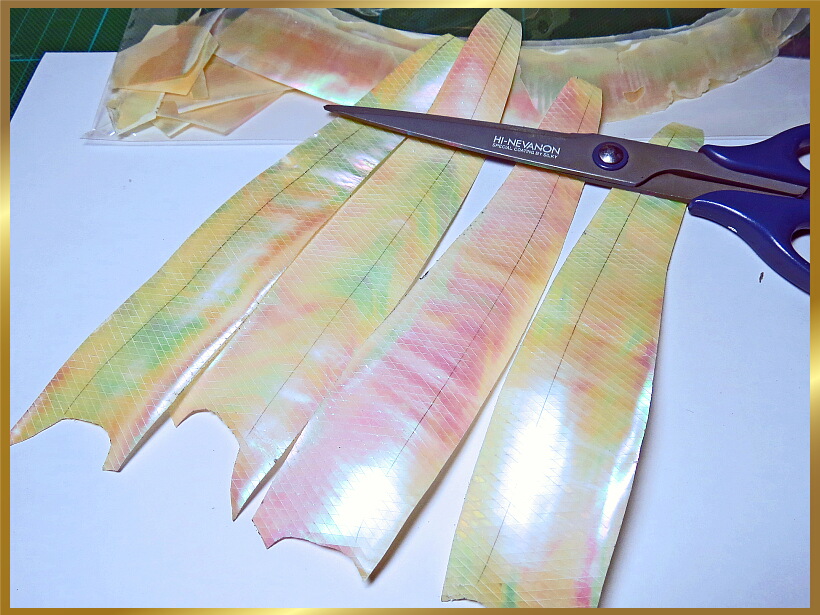
There are two types of shellfish, natural shellfish and processed sheet shellfish.
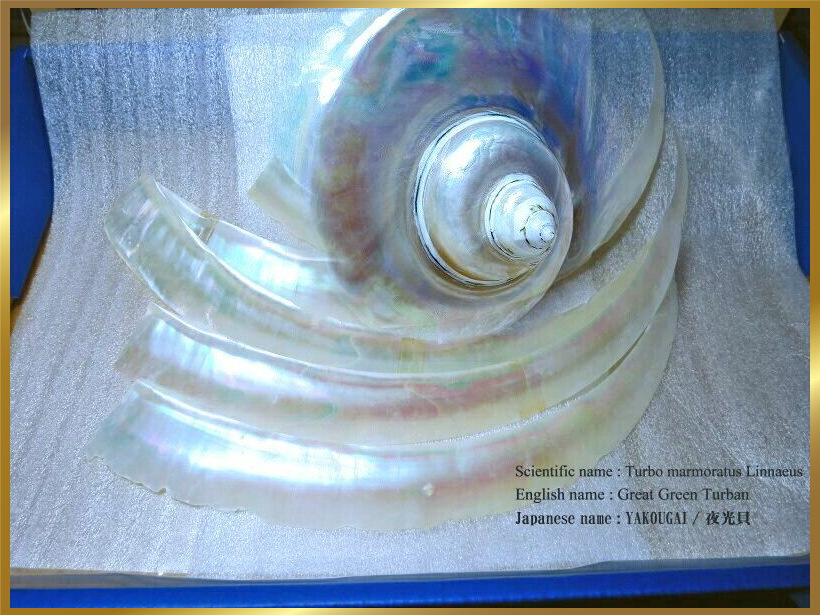
There are "white butterfly shellfish", "great green turban", "pearl oyster", "sheet processed shellfish", etc.
Silver foil is a material that has been used in traditional Japanese crafts for a long time, and I thought that it could be used in the world of lures, so I conducted various tests.
In general, it is a way to paste with glue, but with this it is impossible to put a scales pattern.
We were able to commercialize it by our own method based on trial and error.
Even though it is widely used in the world, I think that the method of making this is an original method.
Also in Japan, there are only some lure builders who are making silver foil lures.
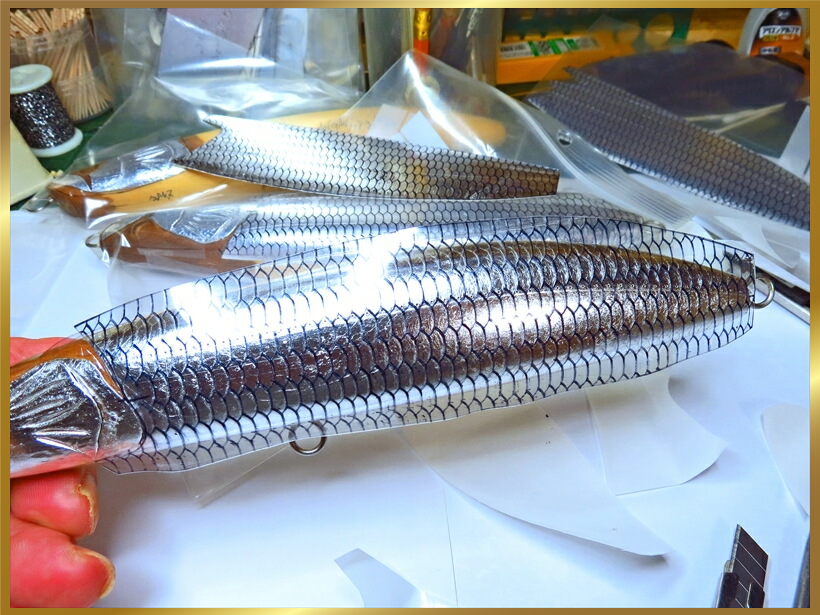
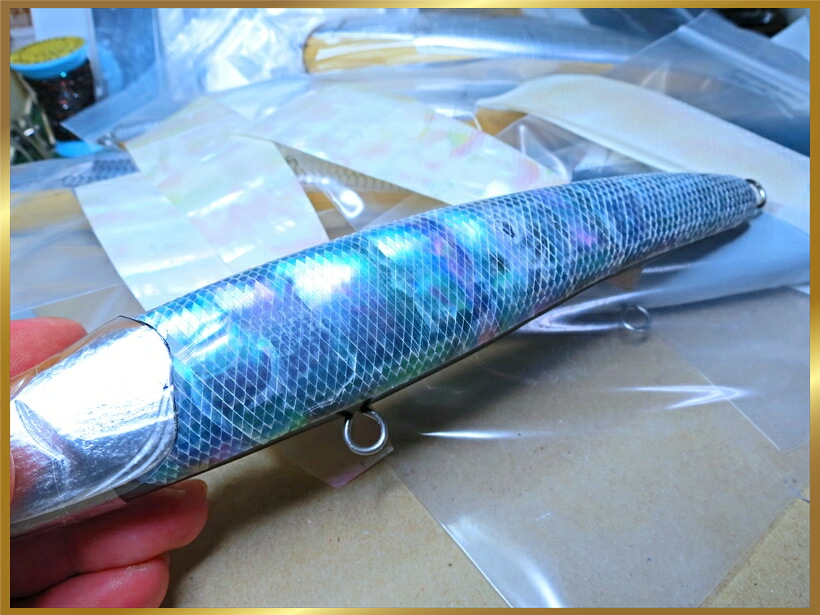
The silver foil has the brilliance of a real fish, and underwater it has a transparent luster that is close to white and attracts fish.

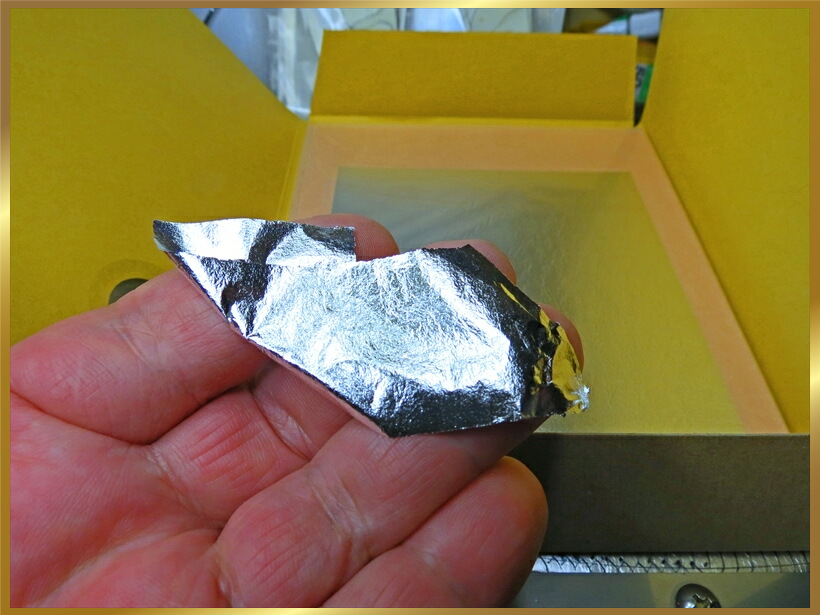
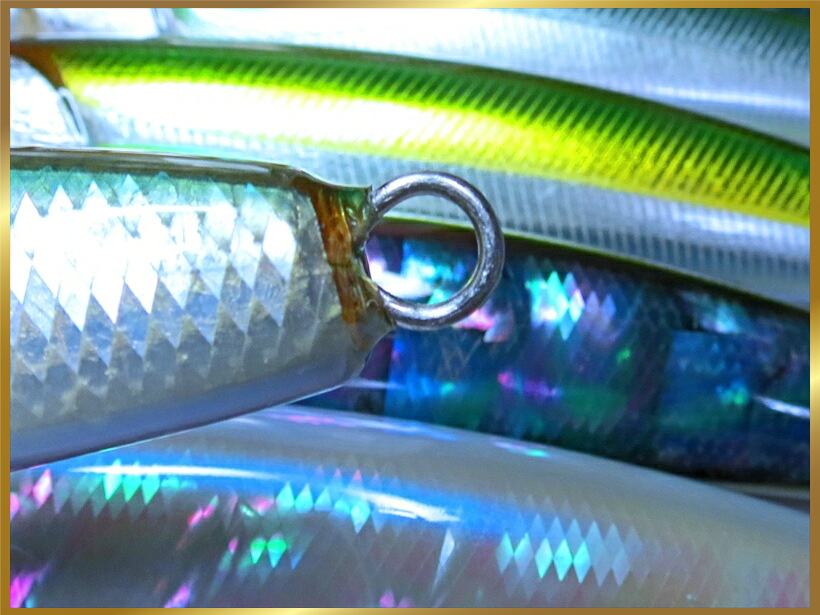
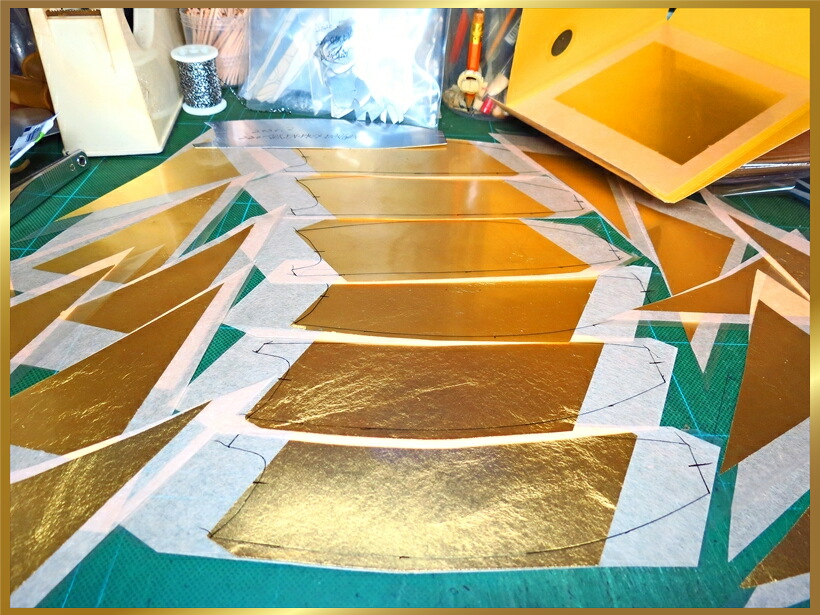
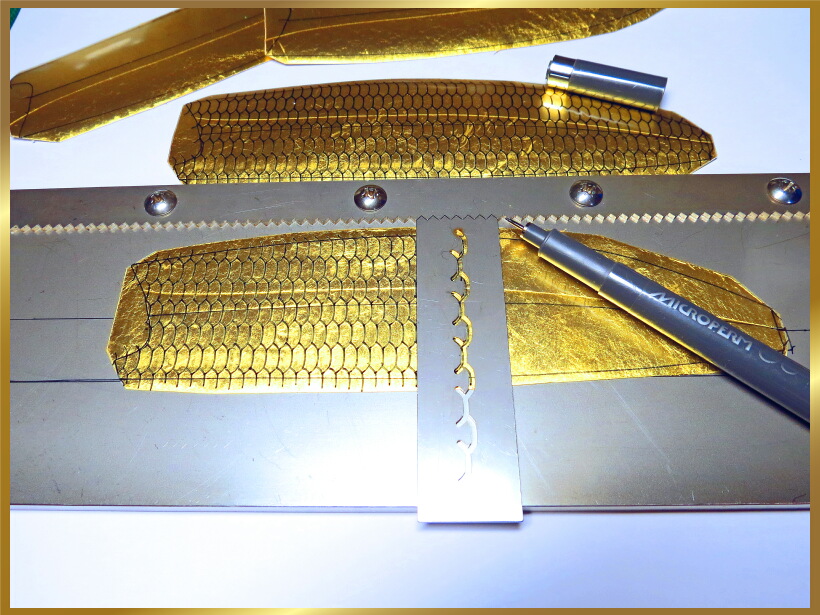
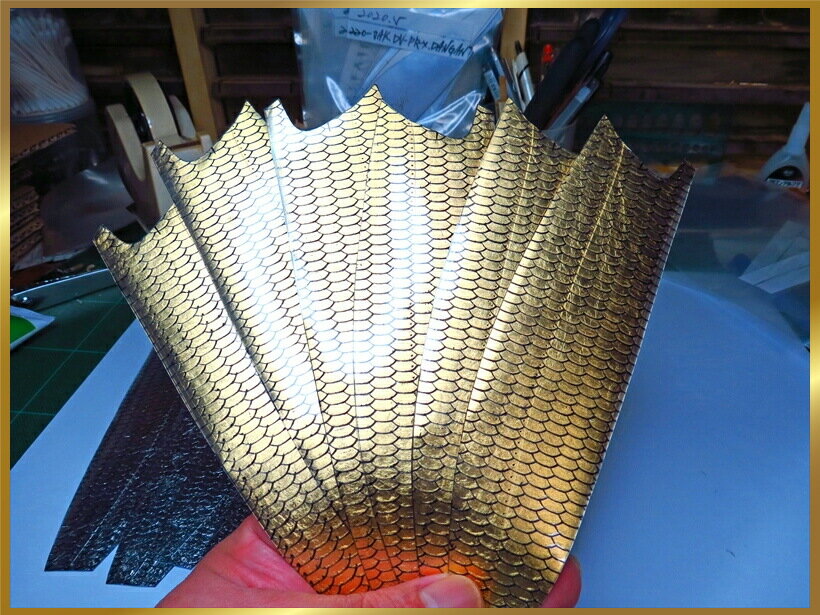
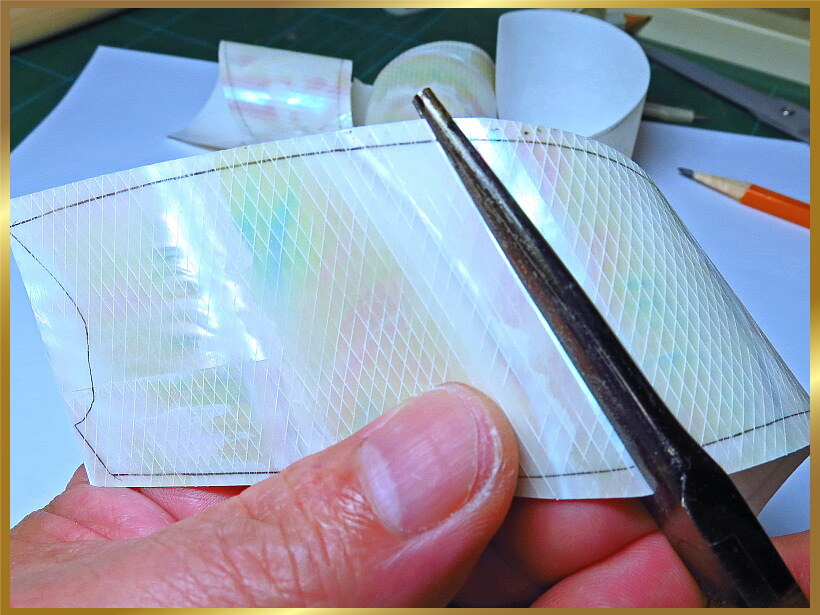
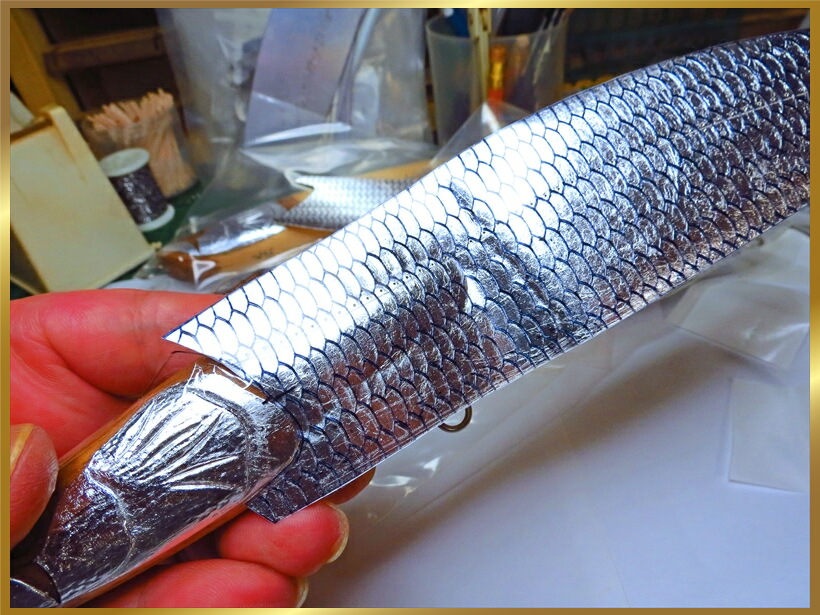
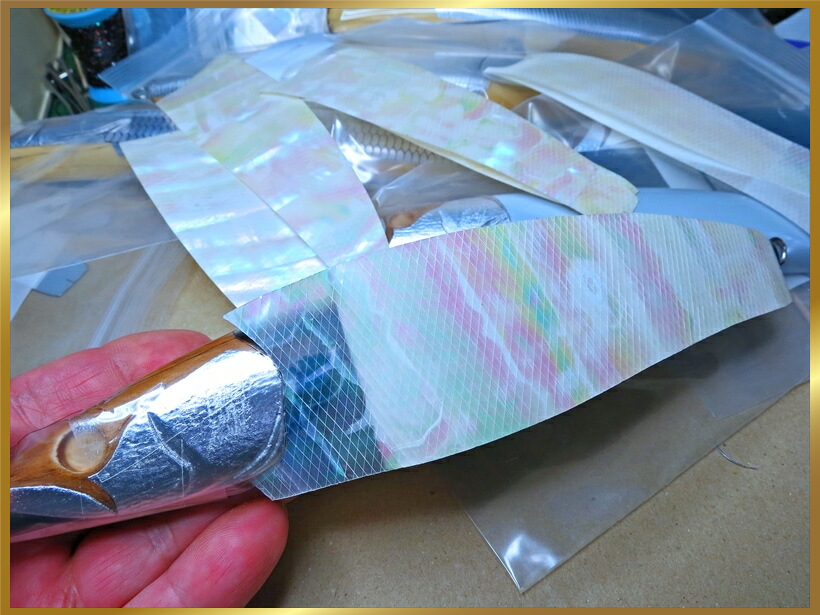
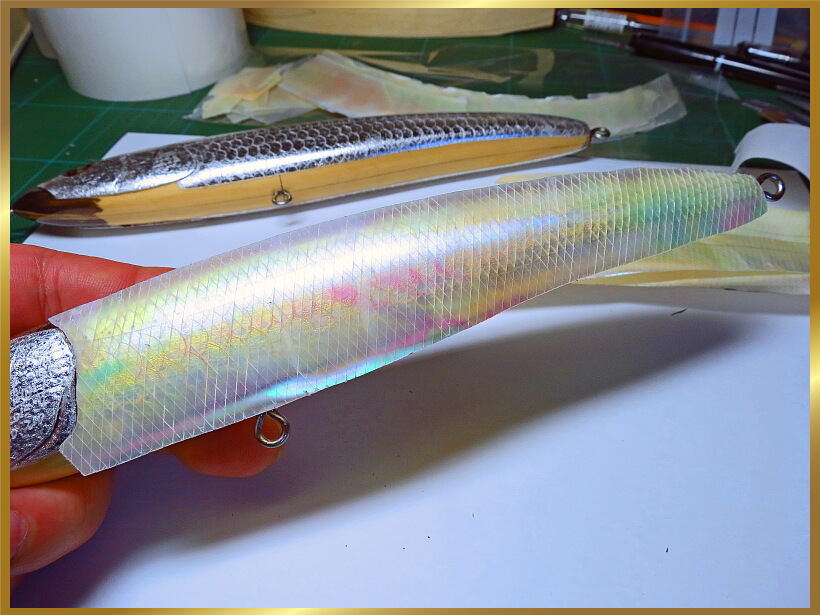
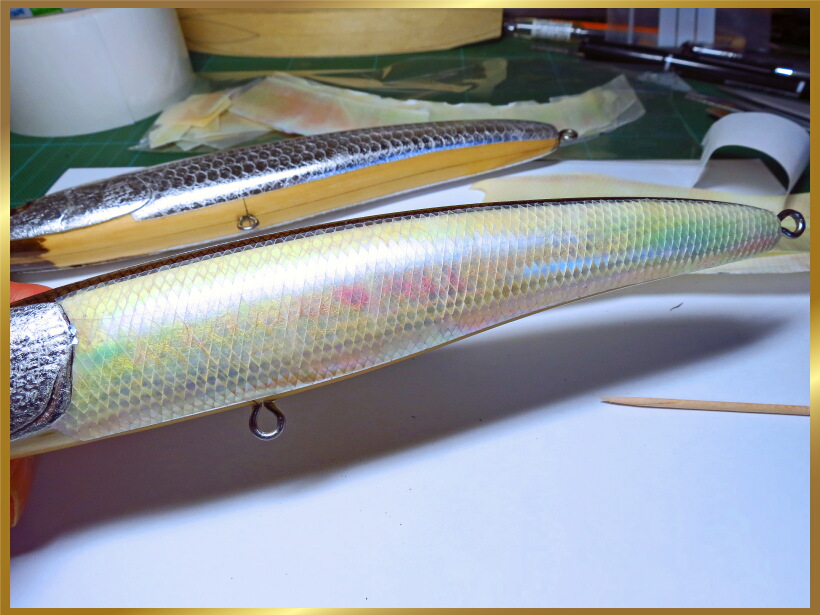
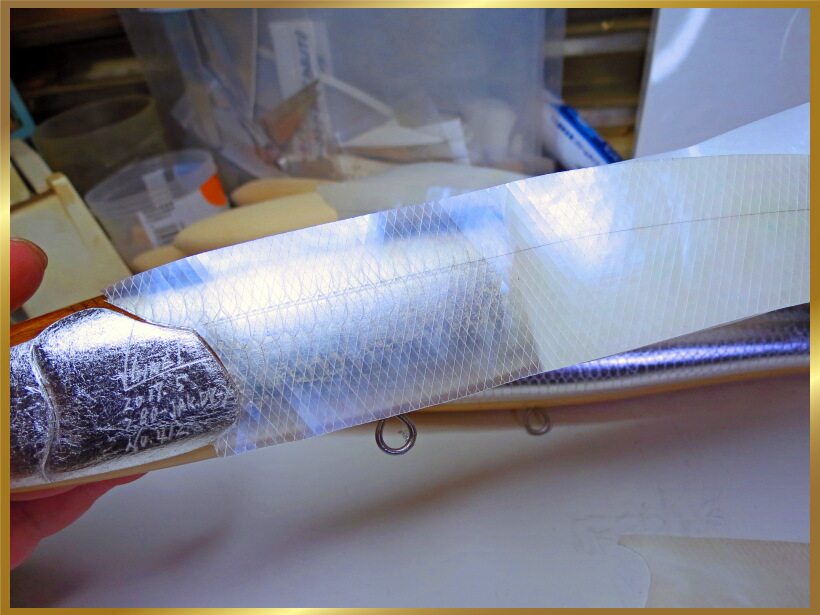
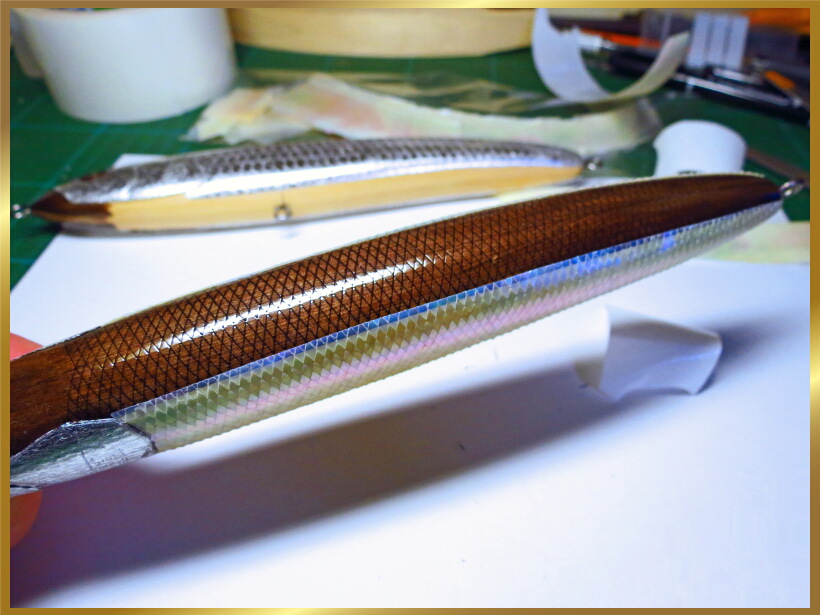
19. Add a "scale" pattern to the pure silver foil material
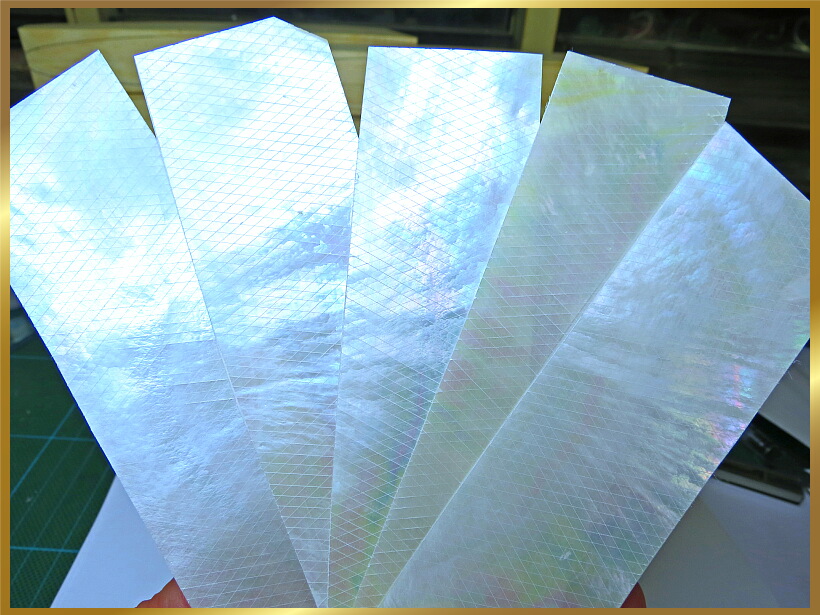
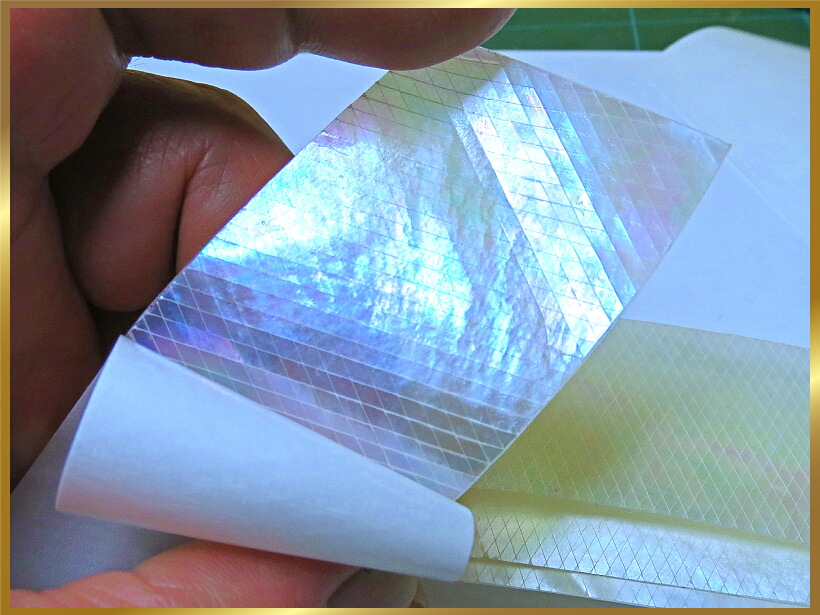
"Pure Silver Foil" uses items protected with Tetoron film (about 16 microns thick).
With this item you can touch the surface of pure silver foil.
Next, I will use a double-sided tape (acrylic polypropylene film as a pressure-sensitive adhesive) to be used.
The face part uses paper double-sided tape.
Silver foil and acrylic double-sided tape are easy to get wrinkle when stuck to the lure because there is no elongation.
Paper double-sided tape is used for facial parts because it can respond to slight elongation.
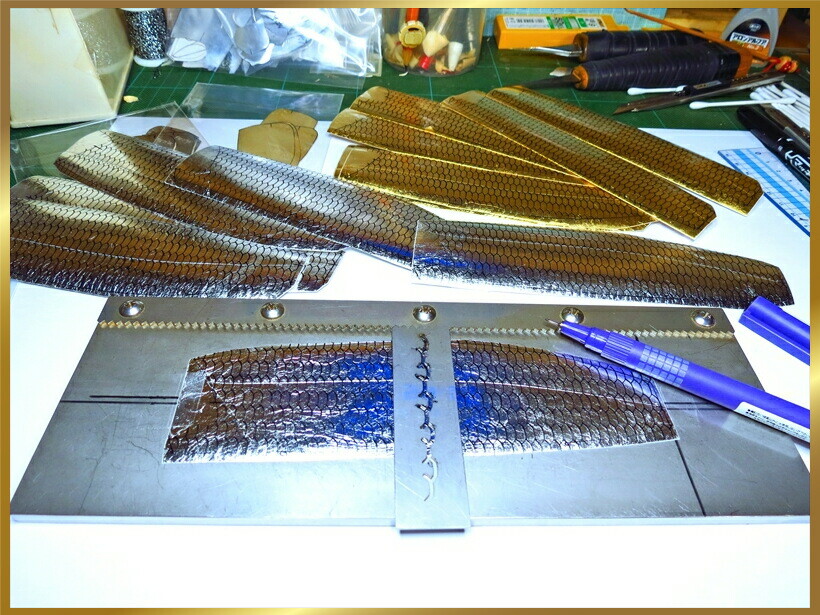
When sticking the body part of the silver foil, we will make a semicircular "Scales pattern" with a cutter so that wrinkles do not enter.
For this image, cut the semicircular scales one by one with a cutter.
We cut the material of micro with a knife and we are connecting it slightly delicately with a piece of double-sided tape.
If you do not cut the double-sided tape on the base, wrinkles will occur when you attach the silver foil, so
It requires a force distribution that looks like a micron.From the builder fellows, it is said to be a technique of God.

20. Shell material
There are two types of shellfish paste materials: the natural shellfish "White butterfly shellfish" and "Great Green Turban".
Sheet shells include "Japanese pearl oyster" and "Great Green Turbans."
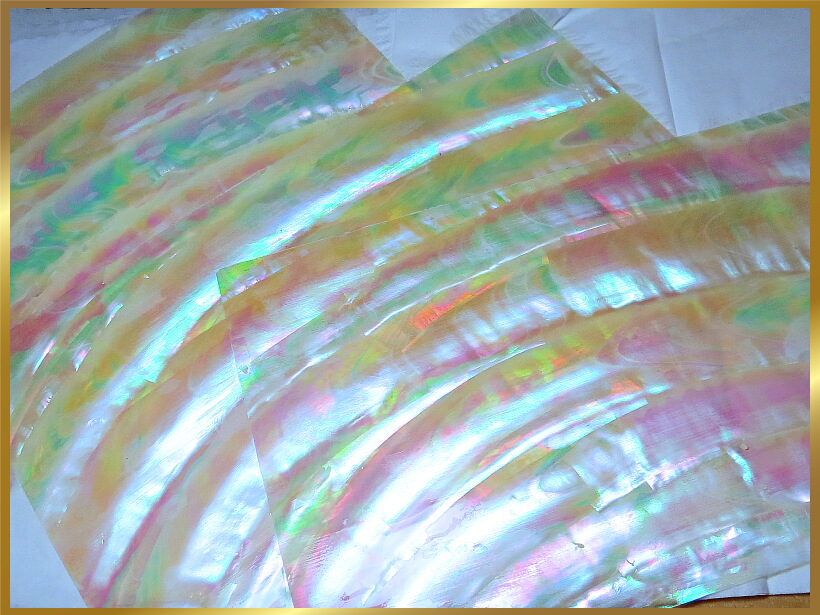
Shell pasting specifications can be divided into shell type paste finish with foil as the base and shell pasting specification after coloring.
The pure silver foil shell pasting specification is transparent with elegant gloss and beautiful.
In the case of body coloring, the gloss of shellfish comes out all over and fits the sheet shells.
21. Natural shellfish "Great Green Turban"
It is the most expensive shellfish in Japan, and there is no large shellfish material.
For large lures, I think that the size of the lure will be limited because there are not many matching shellfish.
I am fascinated by the gloss like noble lady.
22 Natural shellfish "White butterfly shell"
White butterfly shellfish has a glossy and beautiful finish just like a pearl.
Since there are no large natural shells, large lures require work to connect shells to each other, and the connection point is faintly visible.
It is the most expensive shellfish in Japan, and there is no large shellfish material.
23. Great Green Turban / Japanese pearl oyster "Sheet shell"
In the case of the seat shell, I think that the one that painted the lure body matches the material of the shellfish.
Depending on the color of the base, various luster colors are applied to shellfish, so it can be used for a wide range of applications.
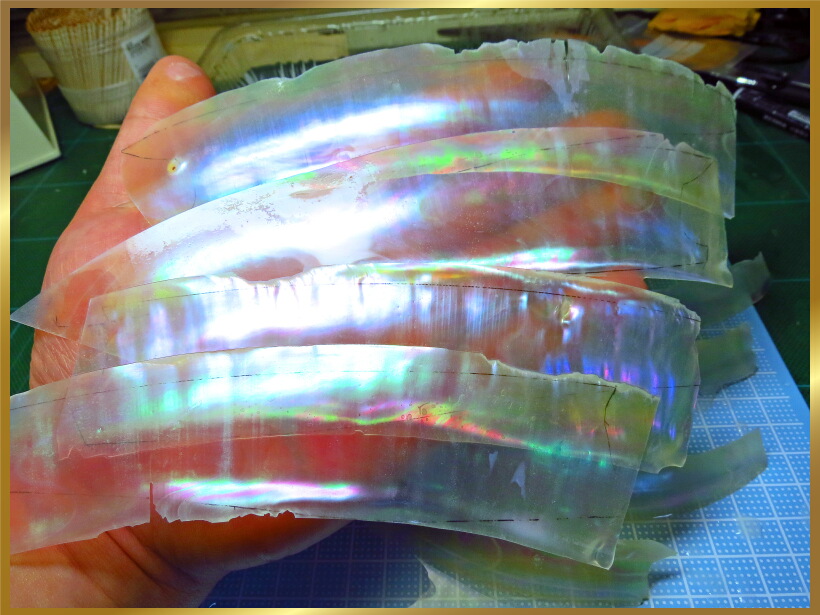
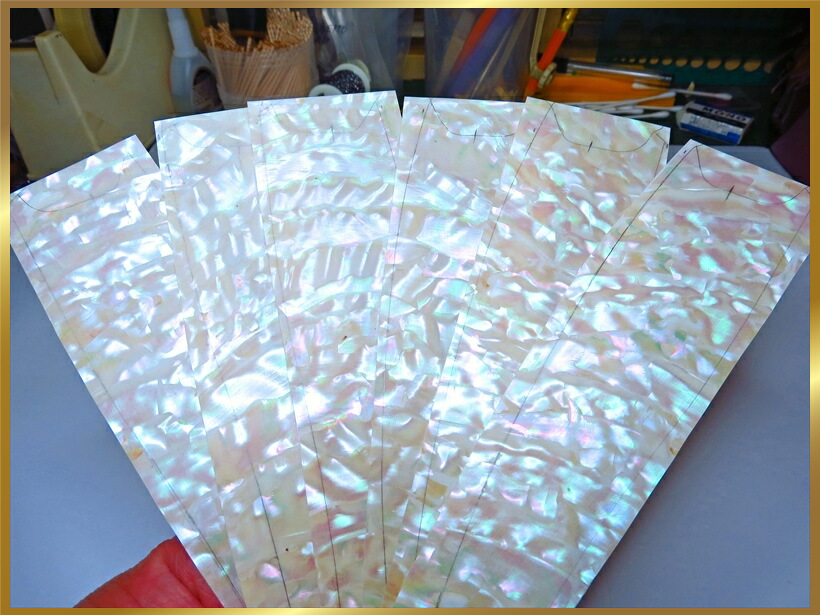
24 Shell Diamond Cutting
We process shells into diamond cut shape.
Double-sided tape (acrylic polypropylene film as an adhesive) is used to bond the shells.
Next, cut into a diamond cut with a cutter.
Then hold the shell with elongated pliers and divide it into exactly diamond-cut shapes with your fingers and nails.
The important thing is to break it so as not to break the diamond cut shape.
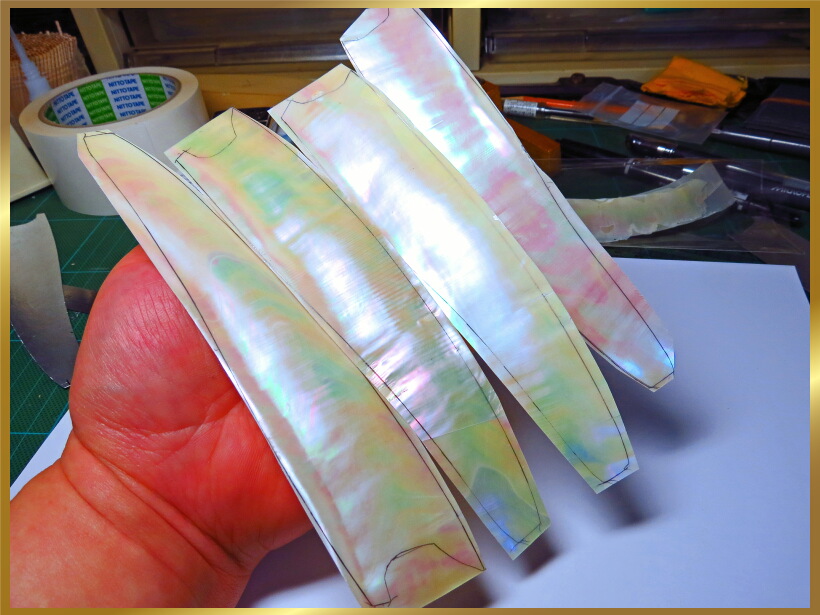
25. Processing of shellfish completed
I am checking the diamond cut of shell.
We often check if there are any places that are not diamond cut.
If it is not diamond-cut cleanly, it will stand out.
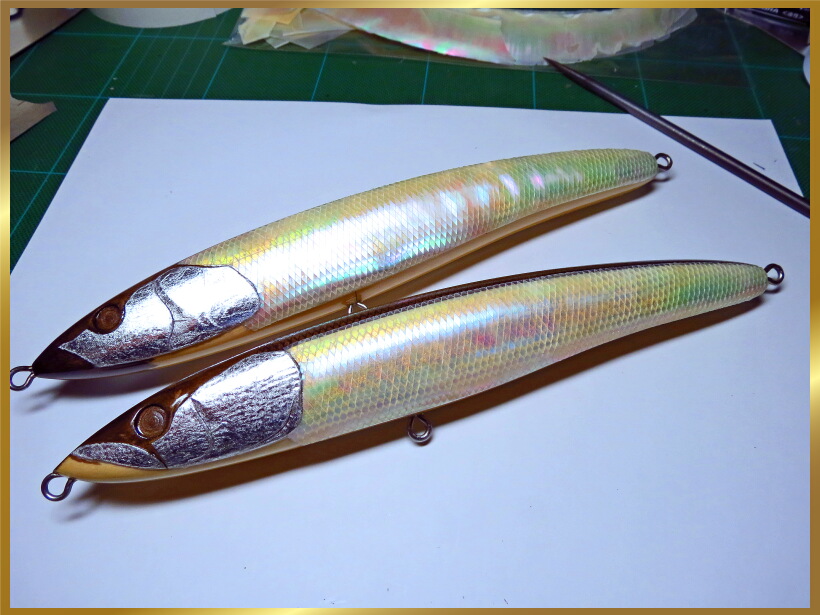
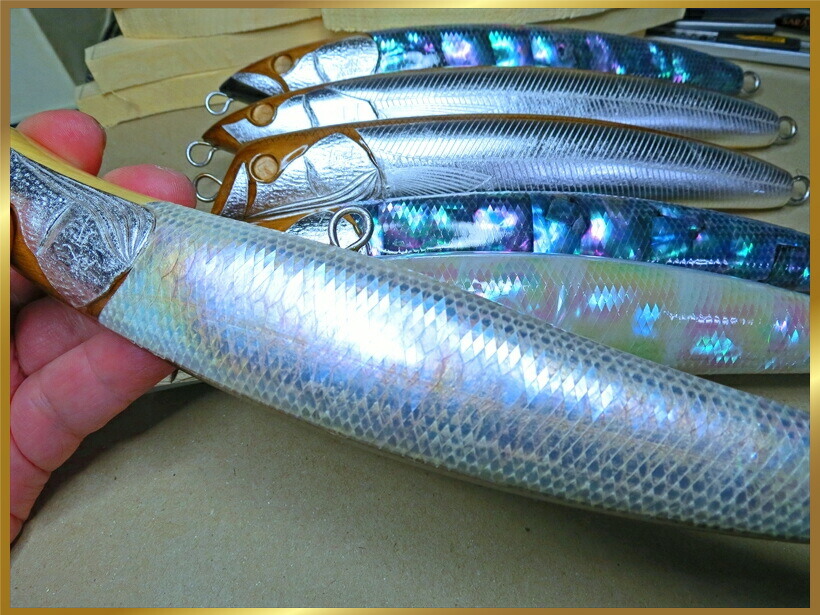
26. Completion of pure silver foil shell processing
Pure silver foil, shellfish diamond cutting processing has been completed.
27. Pure silver foil paste on the face
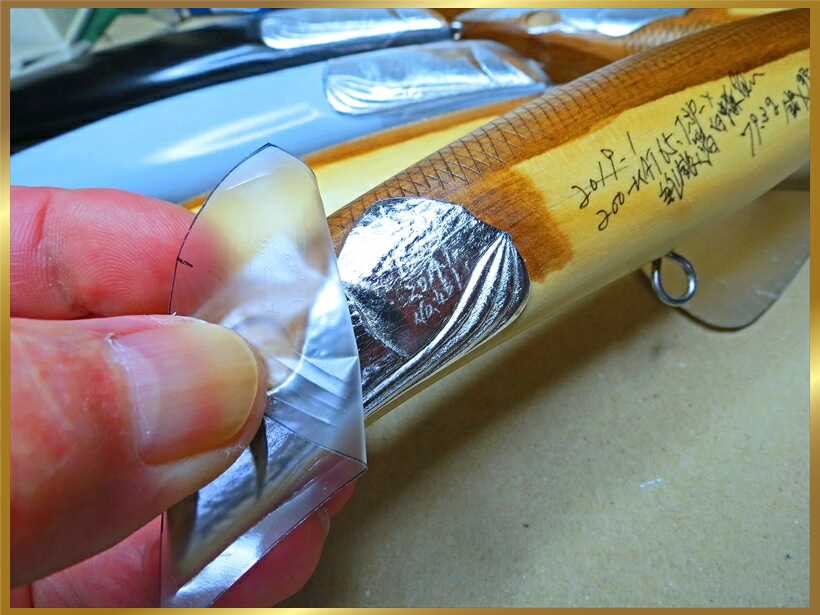
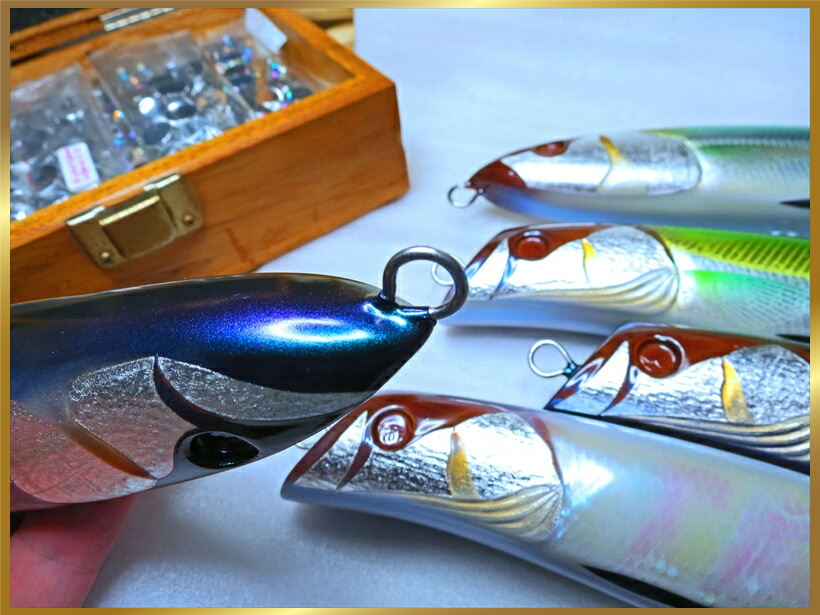
Next, we will stick pure silver foil on the face.
The name of the lure (GINEI), date of manufacture, serial number, builder name (GINKUNI) is stated on the cheek of the face.
28. Antioxidation of pure silver foil
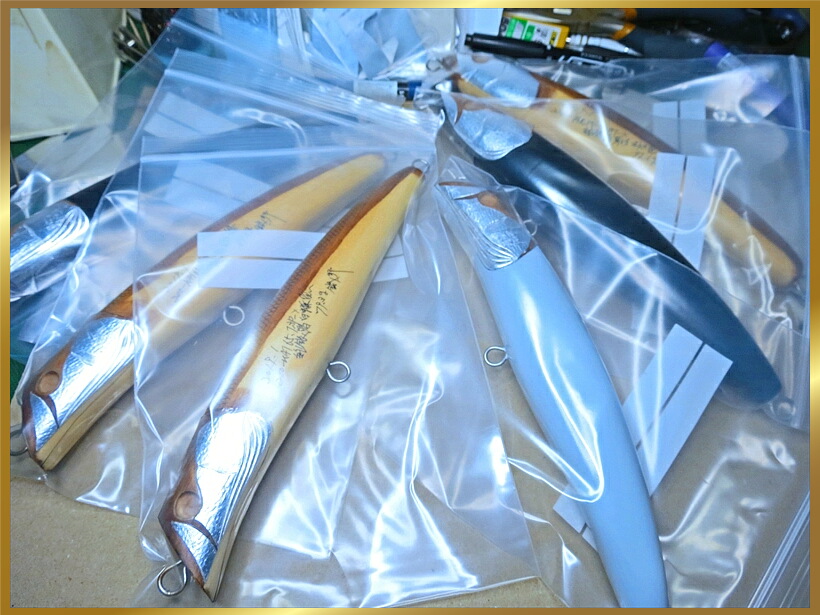
Pure silver foil is oxidized once it is exposed to air, so put it in a bag once.
29. Lure body pure silver foil paste
We will apply pure silver foil on the body part.
Since pure silver foil can not be repositioned, it is decided by one shot.
After pasting the pure silver foil on the body, if it cannot be coated immediately, put it in a bag.
30. Paste the shell material on the body
Next, paste the processed "Seat Shell", "Great Green Turban", and "White Butterfly Shell".
31. Painting the "seat shell" lure body
In the case of "seat shell", I think that the painted lure body matches the material of the shellfish.
After painting, spray diluted "cellulose cement" about 6 times.
In the case of painting, we will stick the "seat shell" without coating the "urethane coat".
32. "Natural shell" Pure silver foil coating
After pasting the Pure silver foil, it will be coated twice with "urethane coat".
The pure silver foil shell pasting specification is transparent with elegant gloss and beautiful.
33. Stick the shells in close contact
In my case, I use the method of bringing the shellfish into close contact.
Wrap the rubber and let it adhere, and leave it for 1 to 3 hours.
If left for more than a day, the angle of the diamond cut surface will become flat and the gloss will narrow, which is not good.
We have completed the pure silver foil and shell pasting, and the work up to this point is an important work for lure production.
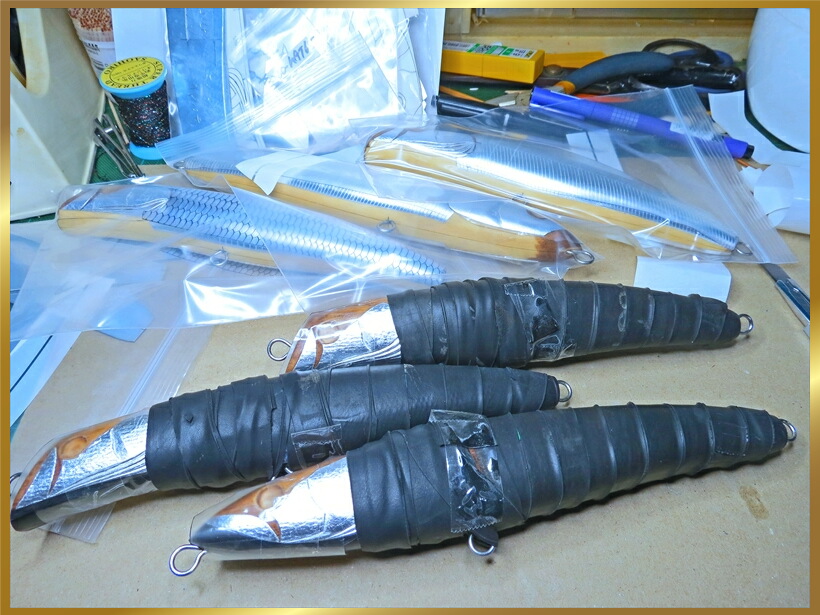
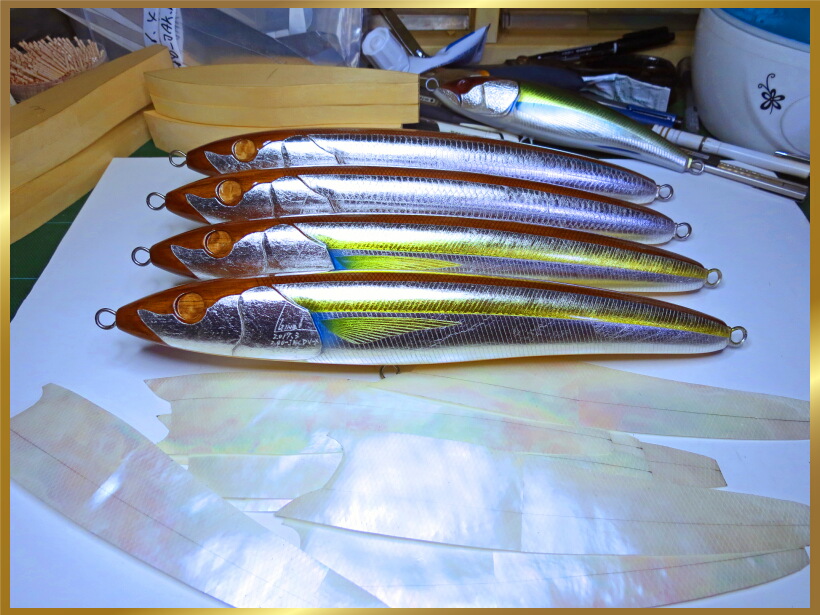
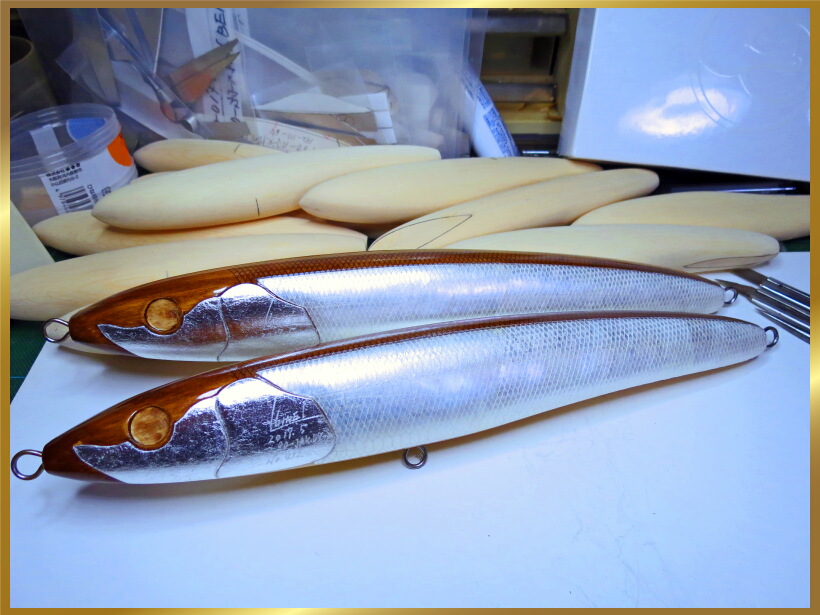
34. Appearance completed
In this way, the pasting of "pure silver foil" and "shell material" was completed.
From the molding, the work so far is serious.
Next, we will do 10 coats of intermediate coating (special formula urethane coat).
Generally, the intermediate coating is about 5 to 6 times, but considering the overall durability, 10 times is the best.
35. Intermediate coating
In the case of "pure silver foil", after coating twice, attach the fins of the body part.
After that, "urethane coat" is coated 8 times.
In recent years, epoxy resin coating agents have been widely used, but
I consistently use "specially formulated urethane coat".
As a feature of "specially blended urethane coat", it has excellent "durability" and "flexibility" crystal-like luster.
We are always thinking about commercializing a lure with excellent durability so that our customers can use it for a long time.


36. Intermediate coating / sanding finish
"Finishing process"The intermediate coating is done 10 times in total with urethane coating agent.
Next, polish it with waterproof paper until it is smooth. Sanding will be introduced in the column below.
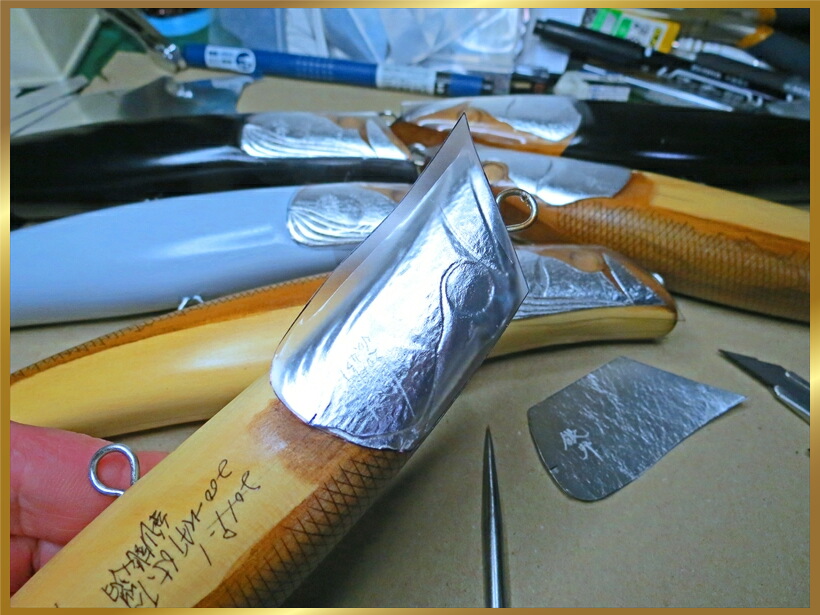
Also, remove the Coat material on the part of the hook hanger with a cutter.
I will explain the part of the hook hanger.
After completion of the intermediate coating, we will remove debur once.
After the coloring and color stopping of the whole lure, we do deburring once.
Urethane coat coating After 3 times, we will remove debur once.
Sanding with the final finish waterproof paper, then coating twice with finishing urethane coat, it will be completed.
Deburring of the part of the hook hanger is done four times of deburring in total.
We will remove deburred at a slightly offset position from the previous time.
In other words, by shifting the cutting plane, it is possible to form a film of hook hanger part in 4 layers.
In general it is normal to finish deburring at the end after finishing the lure item.
In lure strength (including waterproof), I think that the coat composition of the hook hanger part is important.
The fourth image is a masking image, which will be explained in the item below.
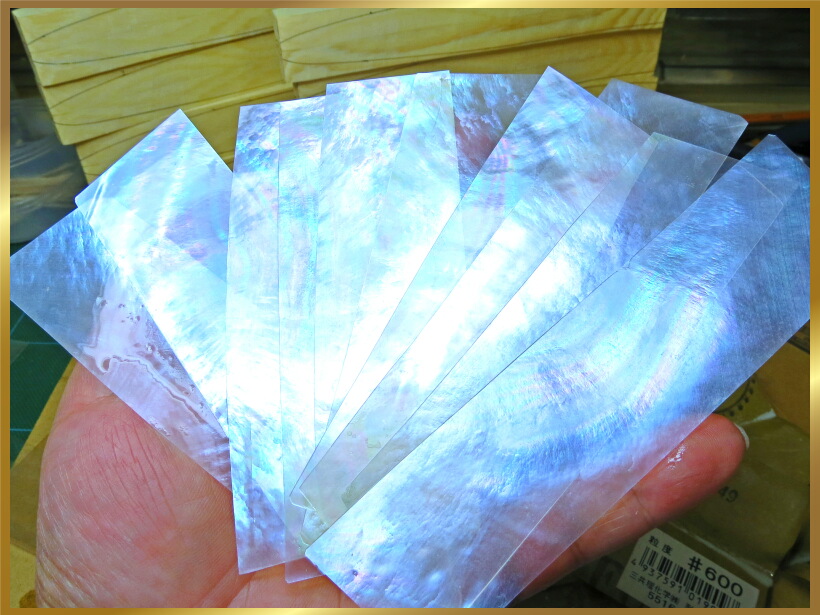
37. Sanding
We would like to introduce the sanding that could not be introduced in the above items.
Sanding was completed with waterproof paper (# 420, # 360, # 600).
Completely remove the shiny part of the coating material.
This is unexpectedly hard work, and curing will be delayed in the current period when the temperature is low, so it will be a little easier.
The urethane coat which is usually sold in general sees many layers of sanding faces.
We use a special compounding urethane coat, so the coating layer can be finished into a single coating layer.
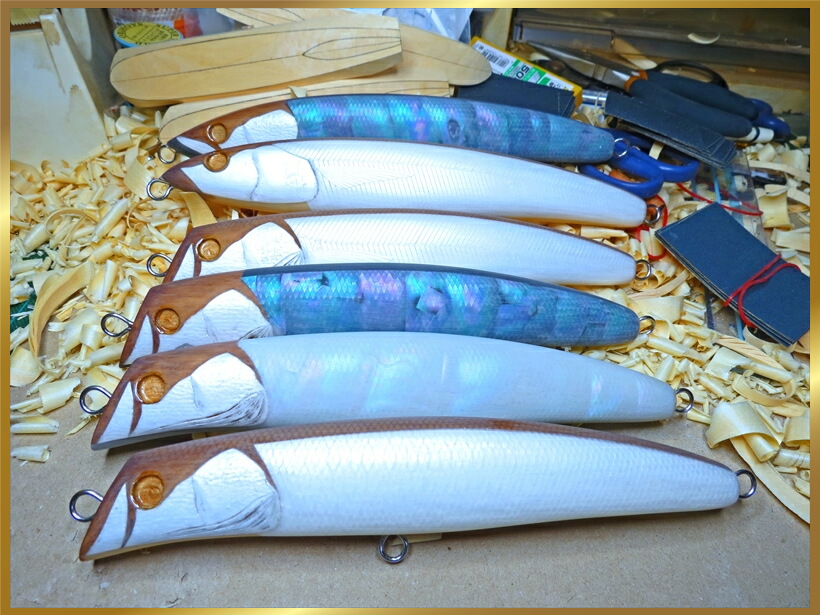
38. Painting / masking
Before coloring, mask it with cellophane tape so that color is not blown into the face.
We also do the masking with the cellophane tape also for the pectoral fin portion.
39. Paint the pectoral fin
For lure type with pectoral fin, the pectoral fin part is painted with clear paint first.
40. Undercoat painting
Wood grain finish around the eyeball, paint around the eyeball in clear brown color.
Next, paint the belly and back with silver color, and for the scale type on the back, paint with clear paint.
Spray diluted "cellulose cement" to prevent the flow of coloring.
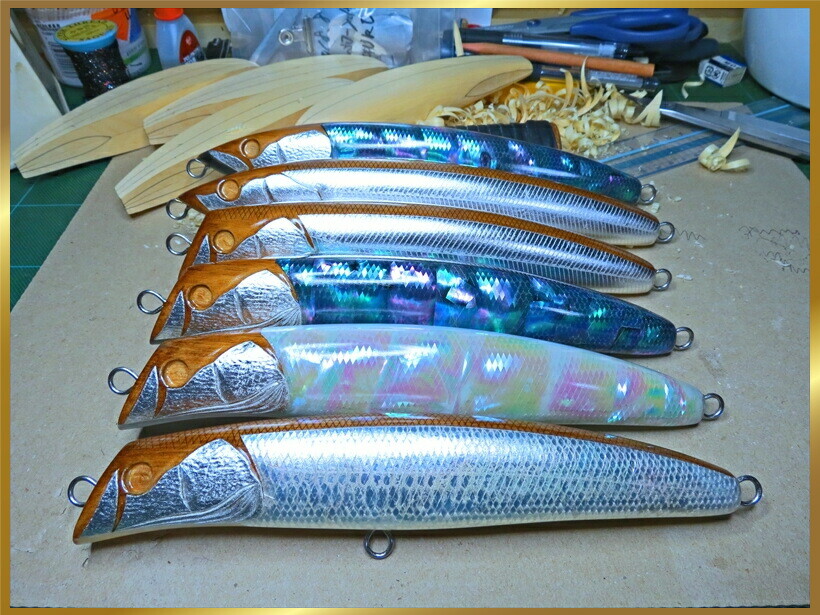
41. Finish painting
Next, for color finishing, we will color the abdomen with "Blue Pearl Color Majora Paint".
We will color the "green purple color 3-layer polarized paint" on the back side, and the spraying of the paint is completed.
42. Remove the masking
Remove the masking on the face.
In the case of urethane coat, care must be taken when removing the masking because it does not adhere to the colored paint.
Make a cut along the edge of the masking with a cutter and remove the masking.
When the face masking is removed, the coloring work is complete.
43. Color stop of colored paint
Wait for the paint to dry for about a day.
Cellulose cement is sprayed on the entire lure about 6 times to prevent the color flow of the colored paint.
Yes, the work up to this point is really hard work, and the finish is a little more.
44. Luer eye insert / coating finish
When color stop is completed, peel off the paint of the part of the hook hanger.
As I mentioned in the hook hanger section, it is a coat layer that can be made into multiple layers.
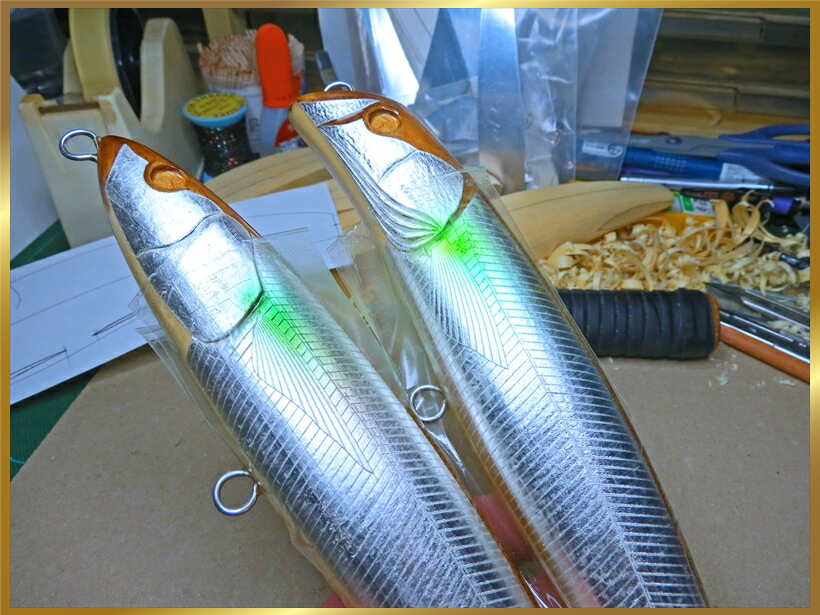
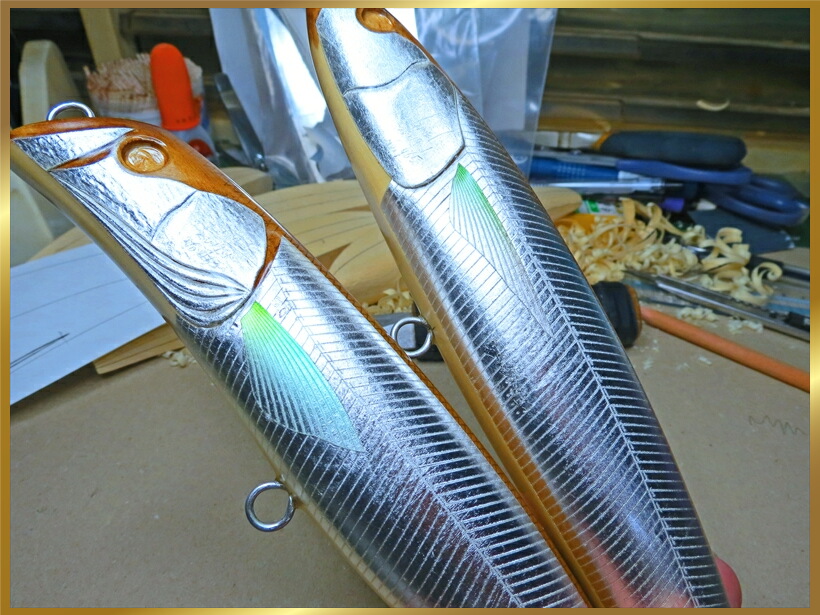
Lure's eye uses semicircular aurora eyes.
3D aurora eye, beautiful shape because it has a stereoscopic effect.
If the position of the left and right eyes and the position of the face are shifted even by 1 mm, it is noticeable.
As well as molding, we use care and emphasis on appearance.
45. Finishing of urethane coat
After completing the lure eye equipment, we will coat the urethane coat three times, waiting for drying.
After that, peel off the coating material of the part of the hook hanger again.
We are finished with three layer polarized paint on the back side.
This paint is a paint with a transparent feeling unlike Majora paint.
Depending on the coloring of the base, it will be a finish with a transparent feel.
The ventral side is finished with three layer polarized paint of blue pearl.


46. Last sanding finish
After coating the urethane coat three times, we will do the final sanding.
When sanding is done after lure painting, we will surely perform because the coating firmly tightens and adhesion also increases.
Generally, it seems to be completed with coating of 1 or 2 times after lure coloring.
In actual fishing, we also care about the coating so that the lure color will not come off due to scratches such as needles.
47. The lure manufacturing process has been completed
After sanding, coat the urethane coat twice, peel off the coat material of the part of the hook hanger.
Finally the long process has finished.
I introduced the manufacturing process by numbering from the first lure molding,
Since I introduced it roughly, there are far more actual manufacturing processes.
Until the last, thank you for seeing.
Finally, We strive to make good products by daily efforts so that you can patronize "GINEI-Lure" products for a long time.
If you are interested in "GINEI-Lure" even a little, there is no happiness that is superior to this as a lure builder.
We wish you good health and happiness. "GINEI"
GINEI Handmade Lure - Production Process "Molding process"
GINEI Handmade Lure - Production Process "Silver foil / shell paste"